Difference between revisions of "TIE Fighter Workshop Battle Bitmap"
From Emperor's Hammer Encyclopaedia Imperia
(Updated the palette links to valid links.) |
|||
| (6 intermediate revisions by the same user not shown) | |||
| Line 2: | Line 2: | ||
==Creating a custom battle bitmap for TIE Fighter Collector's CD-ROM== | ==Creating a custom battle bitmap for TIE Fighter Collector's CD-ROM== | ||
| − | The battle bitmap must be an image that is 91x75 pixels in size. The bitmap must | + | The battle bitmap must be an image that is 91x75 pixels in size. The bitmap must use the tourdesk palette, which will limit the available colors. |
| − | ====Step by Step | + | It is important to note that the image specified is not square, but in game the image appears square. This is because TIE Fighter uses [https://en.wikipedia.org/wiki/Mode_13h Mode 13h] when drawing on the screen. The end result is that the pixel aspect ratio is 1:1.2 in 320x200 mode, and this is something you may want to take into account when creating your custom battle bitmap. |
| + | |||
| + | ====Step by Step with GIMP==== | ||
# Install [https://www.gimp.org GIMP]. | # Install [https://www.gimp.org GIMP]. | ||
| + | # Download the GIMP palette [https://tac.emperorshammer.org/downloads/TIE/tourdesk.gpl tourdesk.gpl]. | ||
# Create a new image of size 91x75. | # Create a new image of size 91x75. | ||
| − | # Open the | + | #: [[Image:Battle_bitmap_1.jpg]] |
| − | # Right click inside the Palettes window and select Import Palette. | + | # Open the "Palettes" dialog by going to the "Windows" menu, choosing "Dockable Dialogs", and then choosing "Palettes". |
| − | # Choose | + | #: [[Image:Battle_bitmap_2.jpg]] |
| − | # Create | + | # Right click inside the "Palettes" window and select "Import Palette...". |
| − | # When you are finished, change the image to use Indexed color mode. | + | #: [[Image:Battle_bitmap_3.jpg]] |
| − | # Choose "Use custom palette" and select tourdesk.gpl. Make sure the " | + | # Choose "Palette file", select tourdesk.gpl, and select "Import". |
| − | # Open the File menu and select "Export As..." | + | #: [[Image:Battle_bitmap_4.jpg]] |
| − | # Name the file, being sure to add the suffix ''' | + | # Create a custom image for your TIE Fighter battle! |
| − | # In the "Export Image as BMP" dialog that appears, expand the | + | # When you are finished, change the image to use the "Indexed..." color mode. |
| − | + | #: [[Image:Battle_bitmap_5.jpg]] | |
| + | # Choose "Use custom palette" and select tourdesk.gpl. Make sure the "Remove unused and duplicate colors from colormap" is '''NOT''' checked and then click Convert. Your image will update to only use colors in the tourdesk.gpl color palette. | ||
| + | #: [[Image:Battle_bitmap_6.jpg]] | ||
| + | # Open the "File" menu and select "Export As..." | ||
| + | #: [[Image:Battle_bitmap_7.jpg]] | ||
| + | # Name the file, being sure to add the suffix '''.BMP''' to the filename so it saves as a bitmap, and click "Export". | ||
| + | # In the "Export Image as BMP" dialog that appears, expand the "Compatibility Options", check the "Do not write color space information" checkbox, and click "Export". | ||
| + | #: [[Image:Battle_bitmap_8.jpg]] | ||
| + | # Now in TIE Fighter Workshop, you can select your new BMP for the Battle Map image! | ||
| + | ====NeoPaint==== | ||
| + | It is also possible to create a valid BMP with NeoPaint. You will need [https://tac.emperorshammer.org/downloads/TIE/TOURDESK.PAL TOURDESK.PAL]. | ||
[[Category:TIE Fighter Workshop]] | [[Category:TIE Fighter Workshop]] | ||
Latest revision as of 15:49, 10 July 2023
With TIE Fighter Workshop, you are able to specify a custom Battle Bitmap that is displayed on the tour of duty screen.
Creating a custom battle bitmap for TIE Fighter Collector's CD-ROM[edit]
The battle bitmap must be an image that is 91x75 pixels in size. The bitmap must use the tourdesk palette, which will limit the available colors.
It is important to note that the image specified is not square, but in game the image appears square. This is because TIE Fighter uses Mode 13h when drawing on the screen. The end result is that the pixel aspect ratio is 1:1.2 in 320x200 mode, and this is something you may want to take into account when creating your custom battle bitmap.
Step by Step with GIMP[edit]
- Install GIMP.
- Download the GIMP palette tourdesk.gpl.
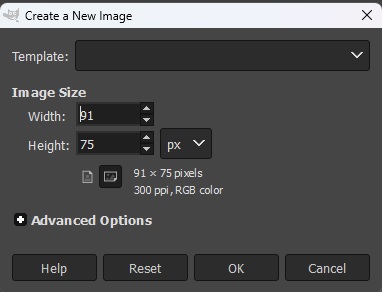
- Create a new image of size 91x75.
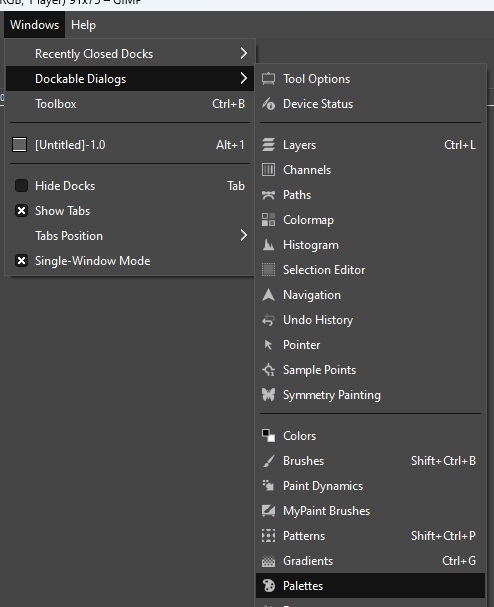
- Open the "Palettes" dialog by going to the "Windows" menu, choosing "Dockable Dialogs", and then choosing "Palettes".
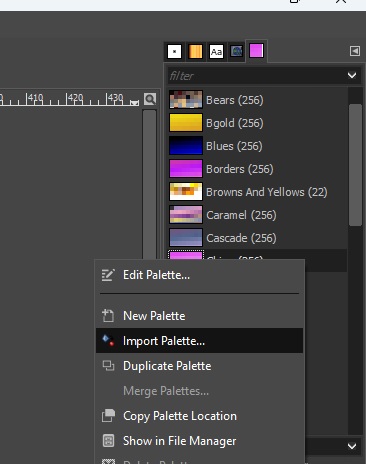
- Right click inside the "Palettes" window and select "Import Palette...".
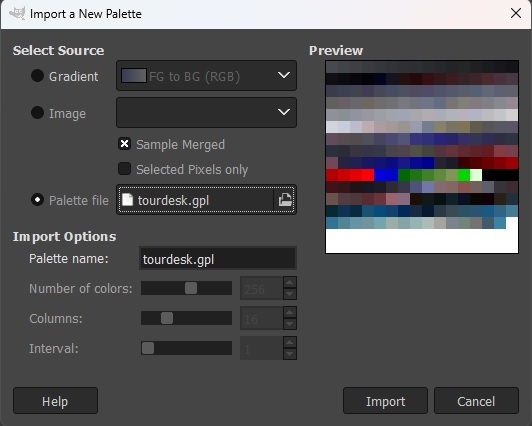
- Choose "Palette file", select tourdesk.gpl, and select "Import".
- Create a custom image for your TIE Fighter battle!
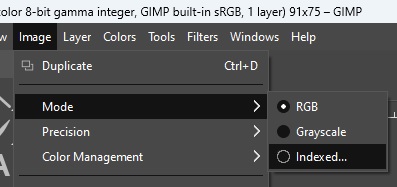
- When you are finished, change the image to use the "Indexed..." color mode.
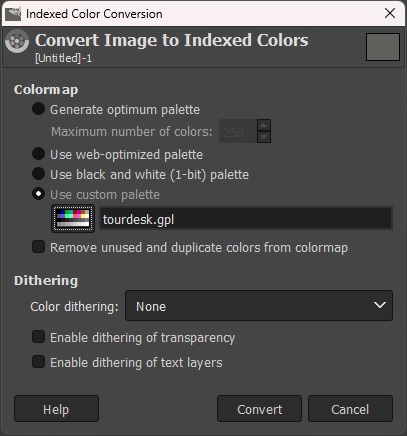
- Choose "Use custom palette" and select tourdesk.gpl. Make sure the "Remove unused and duplicate colors from colormap" is NOT checked and then click Convert. Your image will update to only use colors in the tourdesk.gpl color palette.
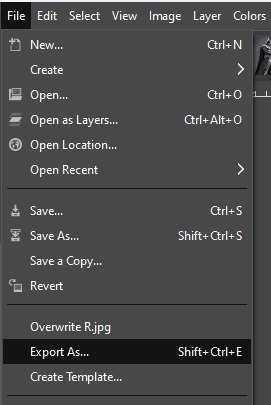
- Open the "File" menu and select "Export As..."
- Name the file, being sure to add the suffix .BMP to the filename so it saves as a bitmap, and click "Export".
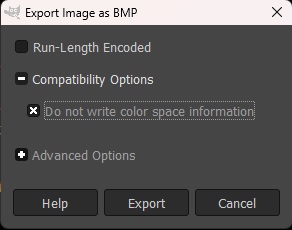
- In the "Export Image as BMP" dialog that appears, expand the "Compatibility Options", check the "Do not write color space information" checkbox, and click "Export".
- Now in TIE Fighter Workshop, you can select your new BMP for the Battle Map image!
NeoPaint[edit]
It is also possible to create a valid BMP with NeoPaint. You will need TOURDESK.PAL.
