X-Wing Alliance Add-Ons – Custom Audio Files
Introduction[edit]
X-Wing Alliance (XWA), and by extension the TIE Fighter Total Conversion (TFTC) mod for XWA, allows the addition of both custom audio files and the reuse of the original game audio files by new Emperor’s Hammer (EH) custom XWA/TFTC missions. You can add audio clips to play alongside the radio messages within the missions and to the briefings given at both the start and end of the missions. These custom audio files are not required for EH missions, but their addition is a very useful tool in storytelling and emersion in your missions.
Why to Include[edit]
The addition of audio allows the missions to have a more premium experience that feels closer to the original game and can aid in conveying the message of the story. Custom audio playing for the commander’s brief allows the player to listen to the briefing while looking at the Mission Craft list and the ship patch that launch at the start of the briefing, rather than having to navigate forward to the animated briefing and then back to the commander’s briefing text. This also has the benefit of allowing the player to look at the custom EH Patch that you may have chosen to include with your missions. Audio files playing with the radio messages allows you to be sure that the player receives the information you are trying to convey, even in the midst of a pitched dogfight where they might not take the time to read the radio message text popping up at the top of their screen.
How to Include[edit]
Audio Format[edit]
The base XWA game can support a narrow subsection of audio formats. The files must be mono audio and have a sample rate of either 11025Hz or 22050Hz. And be encoded as either 8-bit or 16-bit PCM .WAV file format. The lower the sample rate or encoding bit size the more compressed the audio file will be and the smaller the overall file size will be. However, there is a significant drop in audio quality the more compressed the file becomes. The original game manufacturers were able to get around this limitation by using professional audio mixing and mastering techniques which are beyond the scope of this guide. Needless to say, in general you are best served by going with a sample rate of 22050Hz and a 16-bit PCM encoding. While TFTC allows for higher quality audio than the base XWA game, and the game patcher available from X-Wing Alliance Upgrade Project allows you to enable audio all the way up to 96,000 Hz to be used in game, the size of the audio files quickly becomes prohibitively large at those bitrates. Therefore, it is best to simply use 22,050 Hz/16-bit audio, even for custom TFTC content.
Custom Audio Source[edit]
The simplest source of custom audio would be for you, or someone you know, to record themselves speaking the lines or making the desired sound effects. This has the large advantage of the spoken audio not being as wooden as a Text-To-Speech software’s output.
However, as a mission creator you may not be comfortable with your ability to speak with all the different voices you envision for the custom battle. Or do not wish to complicate your work flow process by needing to get another person to voice the lines for the mission, especially if you think you might need to make changes to the audio later.
The tool the author uses is a Text-To-Speech software available through Amazon. Amazon Web Services, at the time of the writing of this guide, offers a 12-month free trial of many of their software packages normally meant for website backend services. One of the software packages is Amazon Polly which allows you to select different “Voices” to speak the audio. Please note that you can change the region that you are connecting to in the web address to change the options you have available to you for voices.
Under additional settings you will be able to select the output file Sample Rate and File format. While in theory you should be able to convert any file source to the format needed by XWA, this author has found that the game often won’t recognize files generated from certain sources. The results that have worked for the author has been to output from AWS in 22050Hz and OGG file format and then use an audio processing software package to covert to the 16-bit PCM .WAV format needed for the game.
Other free, or limited trial, online TTS services that are available are SpeechGen.io and 101SoundBoards. SpeechGen has many of the same voices available as Amazon AWS, but does contain several voices that AWS does not. It is limited on how many characters you can use for free but it seems that if you don't create an account the limit assigned to your IP address gets reset after a few days to weeks. 101SoundBoards is completely free, and has a significantly larger selection of voices. But it can take up to several minutes for your audio to be generated and the quality of the voices are generally less than the other two mentioned services and sometimes significantly lower in quality. Free TTS seems to offer high quality audio that has a monthly allowable for free use. Also there is ElevenLabs which offers 10,000 characters per month for free and gives you a high degree of control over the voices.
An even better solution, if you are not comfortable with having your unaltered voice in a mission, is to record yourself performing the lines as best you can, then upload the audio file to ElevenLabs and use their Speech-to-Speech function. This allows for a MUCH more natural sounding voice, while still being able to have different characters sound differently to one another.
Audio Post-Processing[edit]
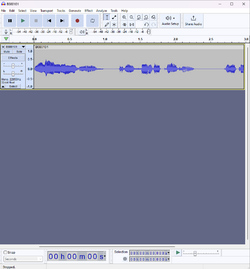
There are many different audio editing software packages out there and some web-based services too, but the author of this guide found errors could be caused by many of the different web-based services. Audacity is a free open-source audio editing software package available for anyone to download.
Audacity is a powerful tool, allowing the creator to layer multiple sound tracks and sound effects together and covert them all into the file format needed by XWA. To simply covert the OGG file from Amazon Polly into the needed file format, you need to simply.
- Open the file in Audacity
- Adjust the gain of the source file (see discussion later)
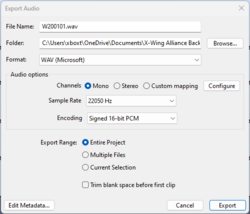
- Then covert to .WAV format by going to File->Export Audio
- Make sure the Format type: is WAV (Microsoft)
- Make sure the audio channels is: Mono
- Make sure the Sample Rate is: 22050 Hz
- Make sure the Encoding is: Signed 16-bit PCM
- Name your file (see below for file name requirements) and hit Save
You also can add different sound effects and alter the initial audio file, allowing you to increase the perceived number of voices available to you from the initial Text-To-Speech software.
Audacity also allows you to directly record audio using a microphone attached to your computer.
Adding Audio to Briefings[edit]
One thing to note first, you are only able to add custom audio to briefings in digital copies of XWA and to all copies of TFTC. This means the player will either need to be playing a version purchased from GoG or Steam. The CD version of the game is not able to see to the custom audio files during the briefings as the game is hard-coded to look at the CD (or .iso image) for all briefing audio. It is theoretically possible to modify the .iso image file of the CD, but that is beyond the expectations for anyone in EH to do to run a custom mission. In short, only digital versions will be able to hear the custom briefing audio files. The CD version of the game can be used as the base installation of TFTC and the briefing audio will work correctly regardless.
Second, while for radio messages (see below) there is no required file naming convention or file path (outside of needing to be within the Wave subdirectory within the XWA/TFTC directory), briefing audio must comply with a strict naming format and file location. All briefing audio MUST be contained in a folder named B#M*. Where the # is the battle number, which is 8 for EH custom battles or 20 for EH custom TFTC battles. And the * is the mission number (1, 2, 3, etc.). This folder MUST be placed within the WAVE/FRONTEND directory within the XWA/TFTC main directory. The files within the folder MUST also follow a strict naming convention that will be detailed below.
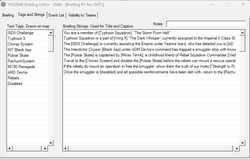
The YOGEME wave manager has tabs for the briefing audio. For adding Commander's Briefings, Mission Success, and Mission Failure Briefings use the Pre/Post Briefing tab. For each briefing type select it in the Categories field on the left and then hit the Add button on the bottom left. It will open a file selection window and you can navigate to the audio you wish to use, anywhere on your computer. YOGEME will copy the file into the correct folder in the XWA/TFTC directory YOGEME is working out of and name it correctly. The same is done for the Animated Briefing but under the Briefing Strings tab. There you will select the animated briefing string on the left under Messages and then in the middle right hit the three dots to open the file navigator.
Below it is detailed how to manually name the files and general guidelines for the different briefings.
Commander’s Briefings[edit]
These are the briefings that play when the player first starts the mission from the Concourse, or selects the Commander’s Briefing at the bottom left of the screen during the animated briefing to be able to see the text of the briefing. The file name of the briefing audio MUST be as follows:
S0#$$**.wav
- Where # is the battle number, again 8 or 20 for EH custom battles
- Where $$ is the two digit mission number (ie. 01, 02, 03, etc.)
- Where ** is the order of the files. This guide recommends making the whole briefing one file, so 01, as this will prevent the audio from being played out of order and make the creation of the audio file simpler.
- Example – S080101.wav
It is best to have the audio match the words that are displayed on screen in the commander’s mission briefing.
Mission Successful Debriefing[edit]
These are the briefings that play when the player completes the mission successfully. The file name of the briefing audio MUST be as follows:
W0#$$**.wav
- Where # is the battle number, again 8 or 20 for EH custom battles
- Where $$ is the two digit mission number (ie. 01, 02, 03, etc.)
- Where ** is the order of the files. This guide recommends making the whole briefing one file, so 01, as this will prevent the audio from being played out of order and make the creation of the audio file simpler.
- Example – W080101.wav
It is best to have the audio match the words that are displayed on screen in the Mission Successful Debriefing.
Mission Failed Debriefing[edit]
These are the briefings that play when the player fails the mission. The file name of the briefing audio MUST be as follows:
L0#$$**.wav
- Where # is the battle number, again 8 or 20 for EH custom battles
- Where $$ is the two digit mission number (ie. 01, 02, 03, etc.)
- Where ** is the order of the files. This guide recommends making the whole briefing one file, so 01, as this will prevent the audio from being played out of order and make the creation of the audio file simpler.
- Example – L080101.wav
This audio file only plays while the player is looking at the mission statistics, not when they are looking at the mission hints. There is no native text being displayed so the debriefing can say anything you want, but it would be recommended to have it include the mission hints as some players don’t go to that screen.
Animated Briefing[edit]
These are the audio files that play when each Caption Text line is displayed in the animated briefing. The file names of the briefing audio MUST be as follows:
B0#$$**.wav
- Where # is the battle number, again 8 or 20 for EH custom battles
- Where $$ is the two digit mission number (ie. 01, 02, 03, etc.)
- Where ** is the order of the files. Unlike the other briefings it IS NOT recommends to make the whole briefing one file as that prevents the player from hearing audio if they skip forward in the briefing. The order that the files are played is controlled by which Caption Text is being displayed in the briefing. The files will be associated with the Briefing Strings in the Tags and Strings tab of the briefing editor. When the Caption Text in the first slot is displayed on the screen, the file named 01 will be played. When the Caption Text in the second slot is displayed on the screen, the file named 02 will be played, and so on. So, while it is not required for the Briefing Strings to be used in order in the briefing, care must then be taken to order the file names of the audio files in the same manner. For this reason, it is HIGHLY recommended to order the Briefing Strings in the order they will be displayed during the briefing when adding custom briefing audio files.
- Example – B080101.wav
Adding Audio to Radio Messages[edit]
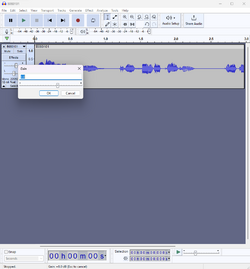
One thing to note first, while the volume level of the audio outputted by Amazon Polly is at a comfortable level for the briefings, it is too quiet to be easily heard over the music and sound effects during the mission. Therefore, it is needed to increase the Gain of the audio file before converting it to the .WAV format to allow the player to hear the radio messages. This can be done by double-clicking the first slider under Effects on the left of the screen for each audio clip in Audacity. This causes a pop-up window to open where you can either type in the gain you wish or use the slider. The author has found that an 8.0db gain increase seems to make the radio messages loud enough to be heard without becoming painfully loud. For TFTC missions, the music that plays during the briefings and in game is generally louder than base XWA and you may need to increase the gain even more for the radio messages and you will need to increase the gain for briefing audio as well.
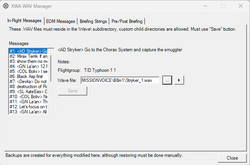
While the briefing files had to conform to a strict naming convention and file path, radio messages are less rigid. The only requirements are that the file be somewhere within the WAVE directory of the main XWA directory and that the file name is 9 characters long or less. A .LST file that MUST be written and placed in the WAVE/MISSIONVOICE folder tells the game where in the directory the needed audio file is and what its file name is. The LST file MUST be named to match your .TIE file for the mission (ie. 1b8m1Anti_R1.lst). The LST file also allows you to use pre-existing audio files from the base game to go with any of your radio messages.
While the audio files can be placed wherever within the WAVE directory, it is recommended to follow the original game’s convention of making a folder within the MissionVoice folder named for the mission (ie. B8m1_Anti_R1) to house all the custom audio files for the mission.
You can either manually create the LST file, or YOGEME can create it for you using the Wave Manager tool in the editor. To find the Wave Manager in YOGEME look under the Tools drop down menu. In the manager you will see a list, in order, of the radio messages of the mission on the left. Select a radio message you want to add an audio file to and then select the … on the right to navigate to the audio file that you wish to associate with that radio message. You will be able to select the play button to preview the audio to ensure it is the file you want. Once you are done selecting the audio files you want for the radio messages you must select the Save button. This will cause YOGEME to write the LST file with the correct name and format to the WAVE/MISSIONVOICE folder.
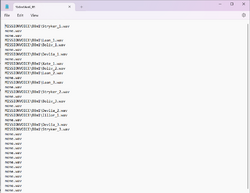
Alternatively, you can write the LST file yourself using a text editor. The required format is each line of the LST corresponds to each radio message in the Messages Tab of the editor, in that order. If you want an audio file to play enter the file path and file name of the audio file at the correct line of the file. All file paths “start” at the WAVE directory and only subfolders from there need to be in the file path. If you don’t want an audio file to play during a radio message, then enter none.wav as the line in the LST file.
The reason that you might not want an audio file to play during a message is to the case that the full message required multiple radio lines due to length. It is best to make the audio file continuous and then not have anything play when the next line of the message is displayed. The game will continue to play the last audio file commanded until it is done, even if the radio messages on the screen have moved on.
You can use the radio messages to play any sound file you want, so this is also a way to get custom sound effects you want added to the mission into the game.
Final Thoughts[edit]
Adding custom audio files to you XWA/TFTC mission is a great way to increase the perceived production value and quality of the mission and is a powerful tool in a mission creator’s arsenal to tell the story that they want to tell. Just remember, as with patches, some players will not want to go to the trouble to install the custom audio files when flying missions. Unlike with patches, this will not keep them from playing the missions, but your content may not be heard by all that play the levels.
Also, your readme file should give the player all the information they need on how to locate the WAV files in the directories and should remind them to delete at least the FRONTEND files, or the briefing audio of your mission will play anytime they play another EH custom battle.

