Difference between revisions of "X-Wing Alliance Advanced Mission Creation"
m |
|||
| (6 intermediate revisions by the same user not shown) | |||
| Line 27: | Line 27: | ||
**Character limit of ~215 per caption text | **Character limit of ~215 per caption text | ||
*Maximum craft per wave for a FG of 6 | *Maximum craft per wave for a FG of 6 | ||
| − | **You can have more craft than 6 in a FG but the formations start having overflow issues that will cause | + | **You can have more craft than 6 in a FG but the formations start having overflow issues that will cause problems |
| + | *You cannot use the GU of 41 | ||
==Getting Started== | ==Getting Started== | ||
| Line 179: | Line 180: | ||
*The first part of the text string tells what the craft type is for the FG (X-W=X-Wing, T/D= TIE Defender, etc.) | *The first part of the text string tells what the craft type is for the FG (X-W=X-Wing, T/D= TIE Defender, etc.) | ||
*The second part of the text is the Name of the FG. This is the name that will be displayed in game on the CMD. | *The second part of the text is the Name of the FG. This is the name that will be displayed in game on the CMD. | ||
| − | * | + | *If there is a number at the end of the text in < >, that indicates there is more than one FG of the same name and type and [https://wiki.emperorshammer.org/X-Wing_Alliance_Advanced_Mission_Creation#Global_Groups_and_Units Global Unit], but that the check box for ''Prevent GU Numbering'' has been activated for the FG. This will still happen, even if the FG are set to different difficulties. The number tells you which one in the list the FG is (higher on the list, lower the number). |
| + | *If there is a number at the end of the text in a ( ), indicates the [https://wiki.emperorshammer.org/X-Wing_Alliance_Advanced_Mission_Creation#Global_Groups_and_Units Global Unit] of the FG. | ||
*Finally, the letter in the [ ] at the end indicates on what [https://wiki.emperorshammer.org/X-Wing_Alliance_Advanced_Mission_Creation#Difficulty_Settings difficulty] the FG will appear | *Finally, the letter in the [ ] at the end indicates on what [https://wiki.emperorshammer.org/X-Wing_Alliance_Advanced_Mission_Creation#Difficulty_Settings difficulty] the FG will appear | ||
**No letter in [ ] means it will always be present, no matter the difficulty | **No letter in [ ] means it will always be present, no matter the difficulty | ||
| Line 395: | Line 397: | ||
***This check DOES NOT factor in what region each craft is in, or on what difficulty the craft is set to spawn on | ***This check DOES NOT factor in what region each craft is in, or on what difficulty the craft is set to spawn on | ||
****Therefore, while this check is useful, it is common for it to show an error in a mission that is fully acceptable | ****Therefore, while this check is useful, it is common for it to show an error in a mission that is fully acceptable | ||
| + | |||
| + | ====Special Craft Types==== | ||
| + | |||
| + | =====Backdrops===== | ||
| + | [[Image:Flight_Groups-Craft-Backdrop.png|center|<center>Flight Groups Tab - Craft Tab - Backdrop Active</center>]] | ||
| + | |||
| + | You will want to add one or more backdrops to your missions. These are the images of planets, suns, nebula, and more that the game displays in the far distance to set the scene of your regions. To add backdrops to your mission by creating a new FG and changing its ''Craft Type'' to '''Backdrop''' (tip: while the drop-down menu is selected or open hit the "B" key until the selection changes to Backdrop). When you select a FG with the ''Craft Type'' of ''Backdrop'' many small changes happen to Craft Tab. First the Fields at the Top Left change to '''R G B''', '''Brightness''', and '''Size''' and the ''Global Cargo'' Field in the Bottom-Right changes to '''Shadow'''. Next most of the fields of the tab become greyed out and not useable, but the '''Backdrop''' Field and '''Backdrops''' Button become useable. | ||
| + | |||
| + | First thing to know about backdrops is that the name '''HAS TO BE''' a string of three numbers, in the format of 0.00 to the maximum value of 1.00, separated by spaces (i.e. 0.88 0.84 0.82). These numbers are the RGB code for the color of light the backdrop will emit in game, not necessarily the color of the actual image, although it is best to have them the same if possible. If you have a name or some other description in the '''R G B''' the game won't know what color the light should be and may not have any light in the mission at all for users who are using XWAU to play your mission. The Backdrop Dialog (see below) will aid in determining the correct RGB values to enter into this field. | ||
| + | |||
| + | The next field, '''Brightness''', is where you specify how much relative light is coming from each light source in game. It can be a very cool effect to have all the light in a region coming from a single source and therefore there will be lots of moving shadows and highlights in the mission as the player and other craft maneuver. The brightness can be any value between 0 and 1. | ||
| + | |||
| + | The '''Size''' Field is where you will enter what scale your backdrop image is in game. Most backdrops in the original XWA game are 256x256 in size, but not all and you will need to experiment to determine what scale you want all your backdrop elements to be. The scale and be any value greater than 0. | ||
| + | *Caution should be taken to not scale up a backdrop too much as it will experience distortion as it is stretched around the sphere of the background in game. | ||
| + | |||
| + | If you know what Backdrop number and Shadow number you want for the Backdrop you can simply enter those values in the correct Fields on the right of the tab, or you can open the Backdrop Dialog be pressing the '''Backdrops''' Button on the far right. | ||
| + | |||
| + | [[Image:Backdrop_Dialog.png|center|<center>Backdrop Dialog Window</center>]] | ||
| + | |||
| + | This dialog opens a preview window where you can see all the possible backdrops to be added to the mission. For most of the lower number backdrops (planets) they have multiple '''Shadow/Variants''' that will make them appear to being lit from one side or the other to differing amounts to allow you to add more realism to the appearance of the planets in your missions. If you move your mouse cursor over the selected Backdrop's preview image, you will see a color square on the far right changing to show the color that your cursor is over in that moment. If you click on that spot in the image the RGB value for that color will be stored to the clipboard and you can then go to the '''R G B''' Field and paste the RGB value as the "correct" name for the backdrop. | ||
| + | |||
| + | Where the backdrop appears in game relative to all the other backdrops is controlled via the [https://wiki.emperorshammer.org/X-Wing_Alliance_Advanced_Mission_Creation#Waypoints Waypoints Tab] and the '''Start Point 1''' for the backdrop FG. All backdrops are "projected" onto the infinitely far away background of the mission and only the relative vector of the start point relative to 0,0,0 matters for the position of the backdrop in game (i.e. 0,5,0 and 0,1,0 will appear in the same place in game, on top of one another). In a case where two backdrops overlap, which one is shown to be "on top" of the other is controlled by which backdrop is lower down the FG list (the higher up the list, the further "in back" the backdrop is). | ||
| + | *Care should be taken in placing the backdrops as sever distortion occurs near the "seams" between the different directions on the background sphere and therefore you should avoid placing round backdrop images (i.e. planets) near the seams (i.e. don't have a backdrop with a start point of 1,1,0). | ||
| + | |||
| + | =====Hyper Buoys===== | ||
| + | |||
| + | =====Asteroids===== | ||
| + | |||
| + | random centered on start point. maximum distance of 2.5 km from center but only when a large number of asteroids in FG. when a smaller amount within 1.5 km. | ||
| + | |||
| + | When you set the ''Craft Type'' to Asteroid Field the game will place random sized asteroids centered about the Start Point 1 based off several parameters. | ||
| + | *Asteroids DO NOT count as normal craft, and instead count against the total allowed number of space objects. | ||
| + | *The number of asteroids and their distance from the center is dependent on the value in '''# of craft''' Field | ||
| + | **A value of 1 will place a larger asteroid randomly within 1.5km of the Start Point. | ||
| + | **A value of 99 will place a dispersion of that number of different sized asteroids randomly within 2.5km of the Start Point. | ||
| + | *Asteroids cannot be destroyed or targeted | ||
| + | *Cannot move in mission except for their battle spins | ||
| + | *Should not give them any Status settings as it would be pointless | ||
| + | |||
| + | =====Mines===== | ||
| + | *Does not change with difficulty | ||
| + | *craft count is how many per side of the grid (i.e. craft count of 4 equals 16 mines) | ||
| + | *grid is centered on start point | ||
===Ar/Dep=== | ===Ar/Dep=== | ||
| Line 448: | Line 493: | ||
===Emails=== | ===Emails=== | ||
An optional, but highly suggested addition to any custom XWA battle is the addition of custom emails for the player to read. You can utilize the emails to tell more of the background story or give a greater amount of humor to your battles. See [https://wiki.emperorshammer.org/X-Wing_Alliance_Add-Ons_%E2%80%93_Emails XWA Emails] for in-depth discussion on how to add emails to the battle. | An optional, but highly suggested addition to any custom XWA battle is the addition of custom emails for the player to read. You can utilize the emails to tell more of the background story or give a greater amount of humor to your battles. See [https://wiki.emperorshammer.org/X-Wing_Alliance_Add-Ons_%E2%80%93_Emails XWA Emails] for in-depth discussion on how to add emails to the battle. | ||
| − | |||
| − | |||
| − | |||
| − | |||
| − | |||
| − | |||
| − | |||
| − | |||
| − | |||
| − | |||
| − | |||
| − | |||
| − | |||
| − | |||
| − | |||
| − | |||
| − | |||
| − | |||
| − | |||
| − | |||
| − | |||
| − | |||
| − | |||
===Global Groups and Units=== | ===Global Groups and Units=== | ||
| Line 479: | Line 501: | ||
===Difficulty Settings=== | ===Difficulty Settings=== | ||
| − | |||
| − | |||
Latest revision as of 19:49, 4 February 2024
Introduction[edit]
This guide’s purpose is to document is one place as many details about the design of a X-Wing Alliance (XWA) as possible. It is not meant to replace the Imperial University courses of Mission Creation and Beta Testing Standards (MCBS) or X-Wing Alliance Mission Design (XAM). This guide will be made to show the functions of YOGEME (Ye Olde Galactic Empire Mission Editor) and guide how utilize its features.
XWA Mission Design Limitations[edit]
Of the X-Wing series games, XWA, being the newest, has the least restrictive design limitations, but it still does have limitations. Some of the limits will be repeated in this guide when appropriate but will also be all listed below for a quick, single reference.
- You are allowed up to 4 regions, connected via hyperspace buoys
- No branching story options or permadeath options for units
- Audio files must be less than 22,050 Hz and 16-bit WAV file format
- Maximum number of craft per region at one time cannot exceed 96 or new ones will not spawn
- Ejected pilots and escape pods count against this limit and therefore any mission where you may be close to the 96 craft limit should select “No Escape Pods/Ejections” as one of the status options for enemy allied craft
- Maximum number of Flight Groups per mission file of 192
- Maximum number of different model files per mission of 22
- Maximum number of AI fired lasers and warheads in-space at one time of 64
- Maximum number of explosions at one time of 32
- Maximum number of “Space Objects” of 128 per region
- Space Objects are:
- Asteroids
- Mines
- Backdrops
- Etc.
- Space Objects are:
- Maximum of 64 radio messages
- Maximum character limit for each radio message of 68
- Non-animated briefing character limit of ~4,000
- Animated Briefing
- Total event limit of ~1,000
- Character limit of ~215 per caption text
- Maximum craft per wave for a FG of 6
- You can have more craft than 6 in a FG but the formations start having overflow issues that will cause problems
- You cannot use the GU of 41
Getting Started[edit]
Readme File[edit]
Every Emperor’s Hammer custom battle or free mission submission must include a Readme file containing specific information and instructions. See MCBS for more details.
MISSION.LST[edit]
You will need to create a custom MISSION.LST file to tell the game the file names for your missions to be able to play. For XWA the Emperor’s Hammer requires all custom battles to be Battle 8 and the first mission to be number 53. See XAM for more details on how to make this file.
YOGEME Setup[edit]
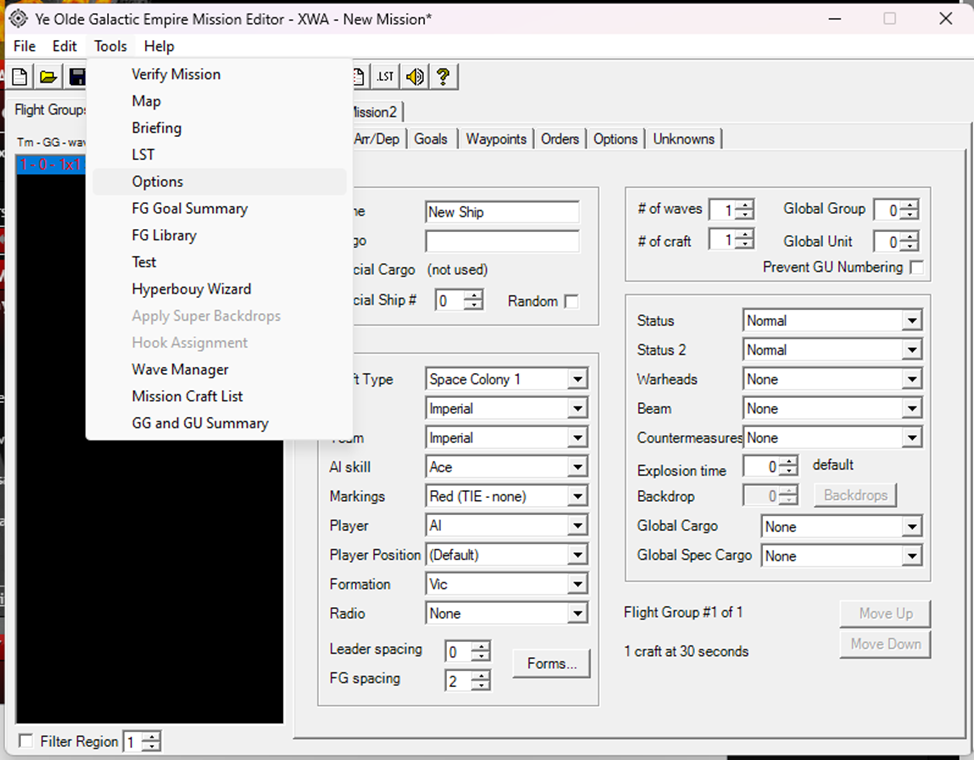
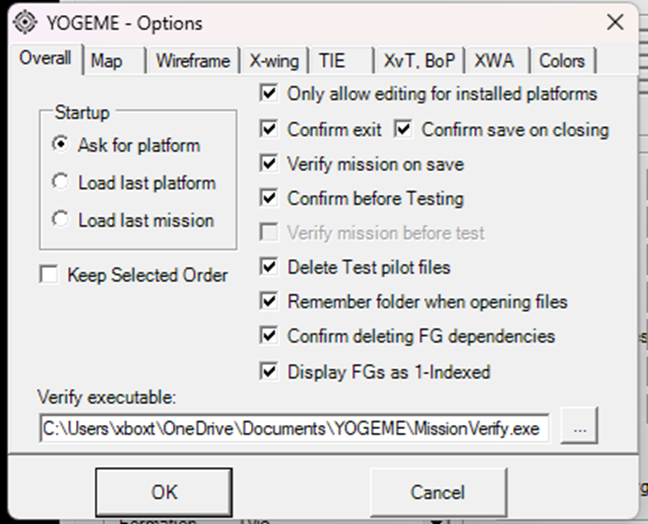
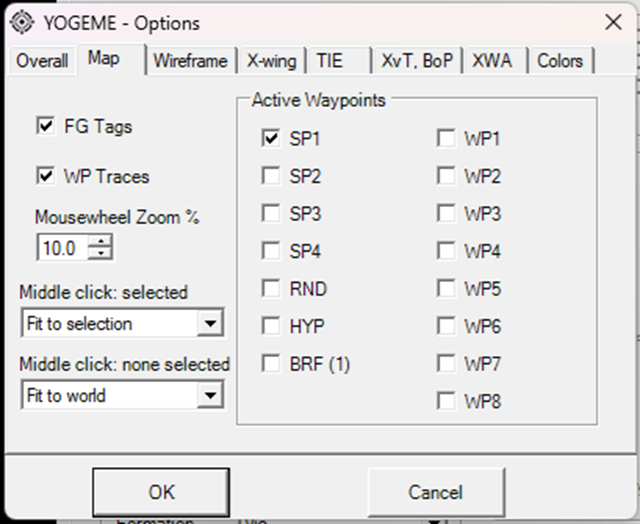
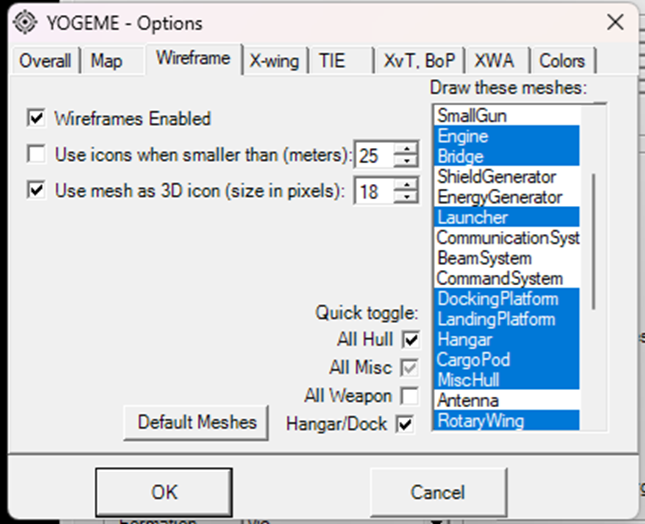
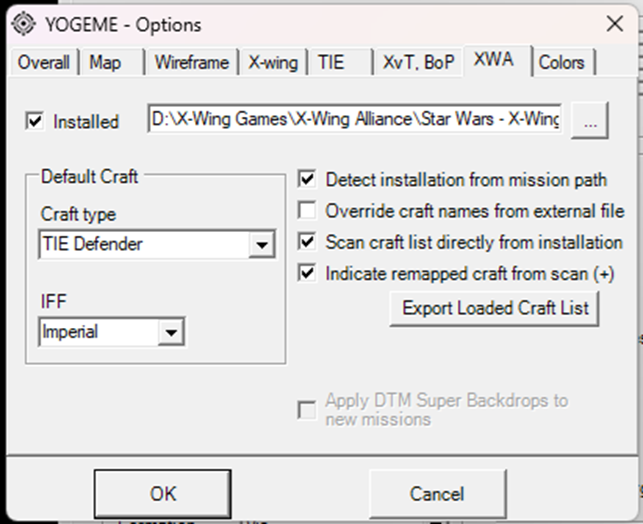
Download and install, following the installation instructions included with it, YOGEME. If your XWA game directory is installed in the default Programs folder on the C Drive, or still has write protections applied to it from where it was copied, set YOGEME to run in Administrator Mode, otherwise it will not be able to edit mission files. Launch YOGEME and go to Tools -> Options menu.
- Overall Tab
- You have many different selection boxes to control the behavior of YOGEME
- For the most part you can leave all the settings at their default values.
- You have many different selection boxes to control the behavior of YOGEME
- Map Tab
- You can customize the behavior of the region map window when you initially launch it
- Wireframe Tab
- Further works to define the level of detail of the representations of the ship and object models when shown in the region map window
- XWA Tab
- You will be able to select the file path of the XWA root directory for the copy of XWA that you are doing mission creation for. It is critical that you set this file path correctly as many of the functions of YOGEME depend on reading files from the XWA root directory
- If you change the file path for the root directory, you will need to close YOGEME and reopen to allow it to properly read the data it needs
- You can select the default craft type and IFF for all new craft
- You will be able to select the file path of the XWA root directory for the copy of XWA that you are doing mission creation for. It is critical that you set this file path correctly as many of the functions of YOGEME depend on reading files from the XWA root directory
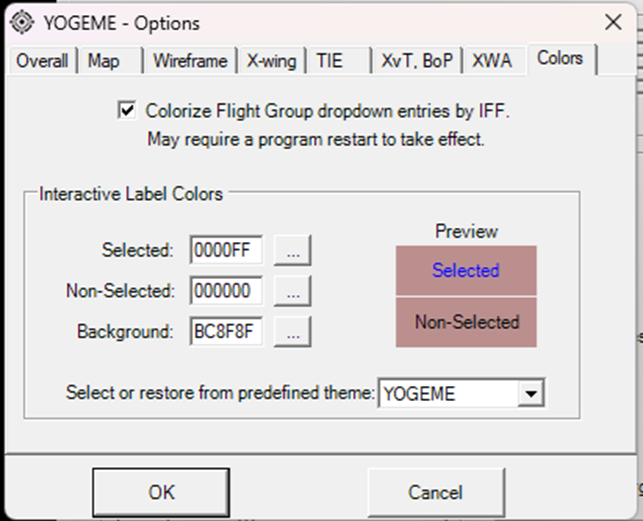
- Colors Tab
- You can customize the appearance of YOGEME in a limited manor
Menus[edit]
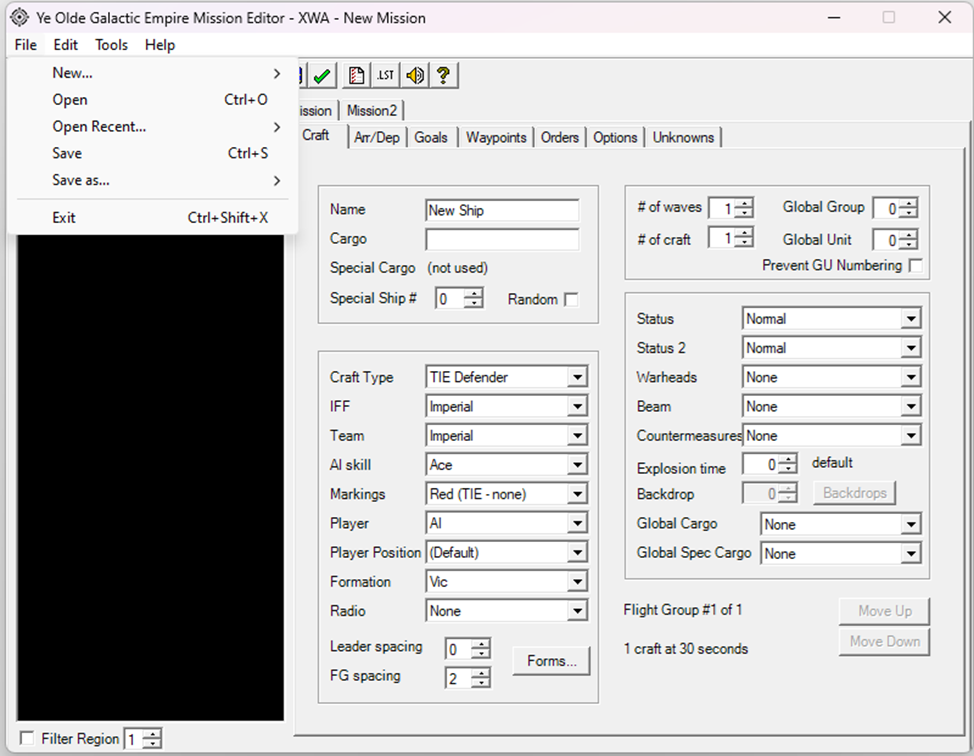
FILE[edit]
The “File” Menu contains what you would expect for a normal Windows Based program
- New...
- For creating a new mission file
- Open
- For opening existing mission files
- Open Recent...
- Will show the last 5 mission files that have been opened by YOGEME to allow for quickly switching between files
- Save
- For saving the current mission file using it’s current name and file path
- Save As...
- For saving the current mission file, but allows you to change the name or file path or both
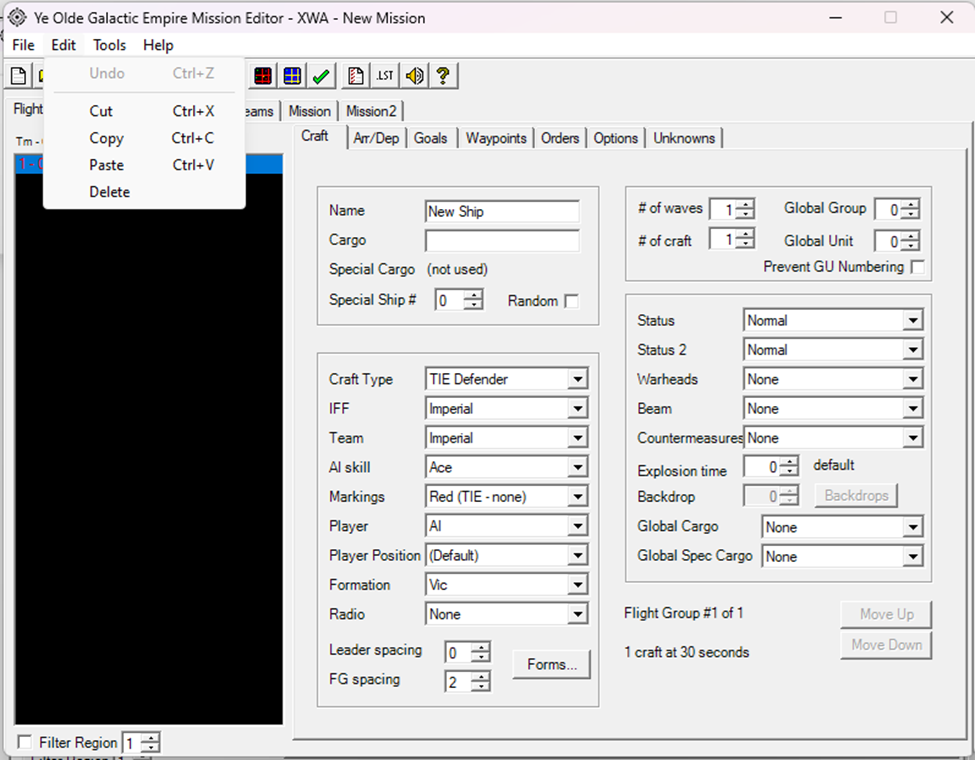
EDIT[edit]
The “Edit” Menu contains what you would expect for a normal Windows Based program
- Undo
- In theory allows to reverse a change that you have but is currently disabled in YOGEME
- Cut
- Allows for the cutting of text from the different text fields
- Copy
- Allows for the copying of either text from a text field or of a whole Flight Group (FG)
- Paste
- Allows for the pasting of either previously cut/copied text or copied FGs
- Delete
- Allows for the deleting of selected text or FG
TOOLS[edit]
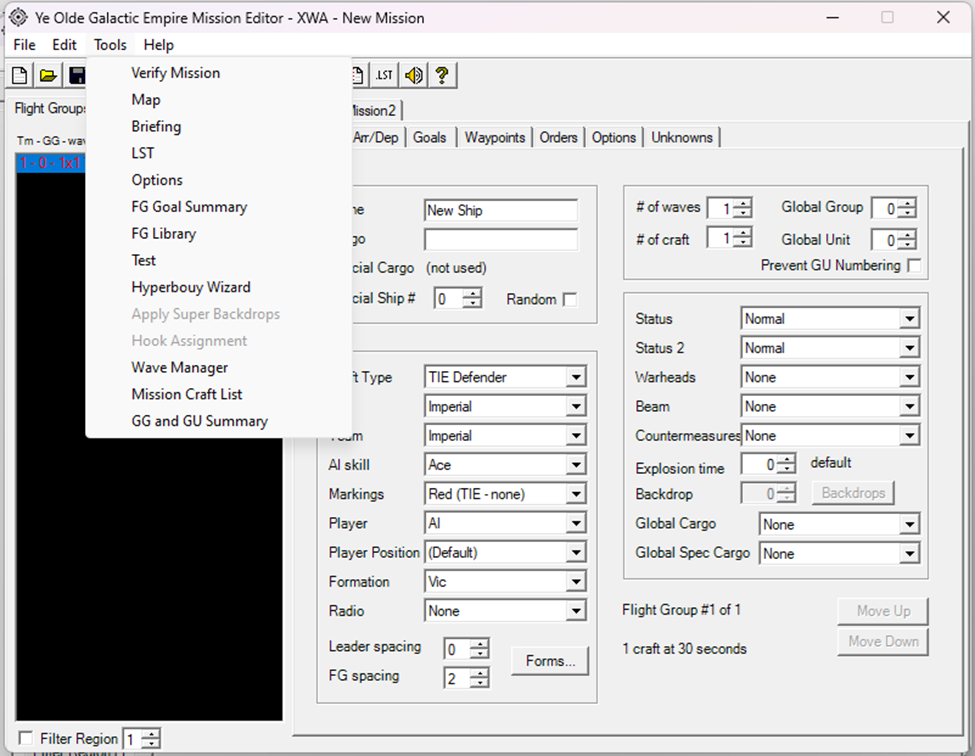
The “Tools” Menu contains many of the functions of YOGEME
- Verify Mission
- This runs a basic check of the mission file for common errors.
- It will often say the mission is NOT VALID, however the mission may be perfectly good to be used
- You will need to read any of the possible errors it shows and determine if they will be a problem
- Map
- This opens the Region Map – See Map Section for more details
- Briefing
- This opens the editing window for the Animated Briefing – See Animated Briefing Section for more details
- LST
- This opens an editing window for the MISSION.LST file – See MISSION.LST Section for more details
- Options
- Opens the Options Menu – See YOGEME Setup Section above
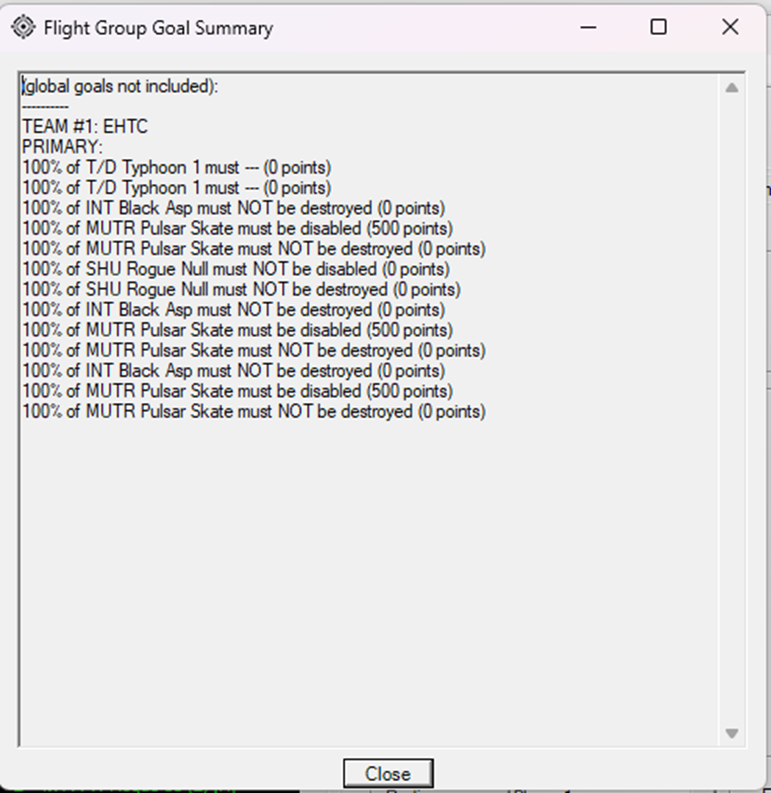
- FG Goal Summary
- This opens a window where all FG Goals are listed in a single place for a quick reference. See Goals Section for more details
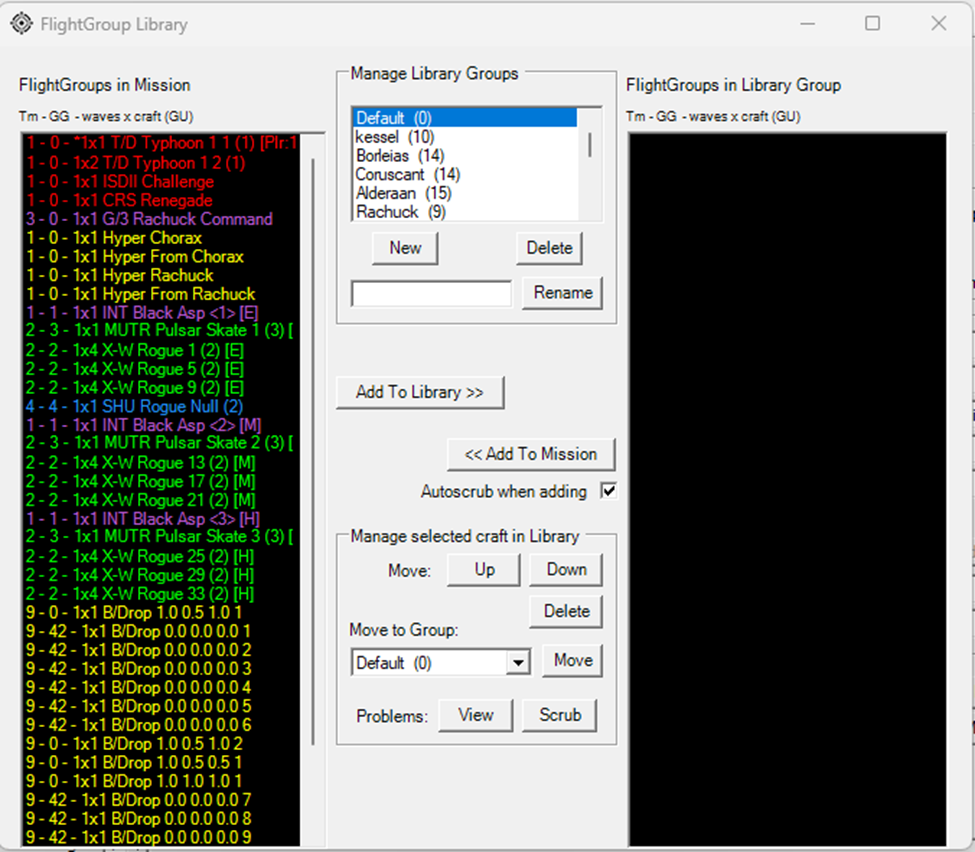
- FG Library
- This opens an incredibly useful window where you can save and organize the FGs of your mission into a common library that you will be able to quickly copy into another mission. This is very useful if you have created a particular region that you wish to use again in another mission.
- Test
- This opens a window from which you can quickly launch into XWA and test the mission you are currently making. YOGEME will automatically create a pilot able to fly the mission you are currently editing.
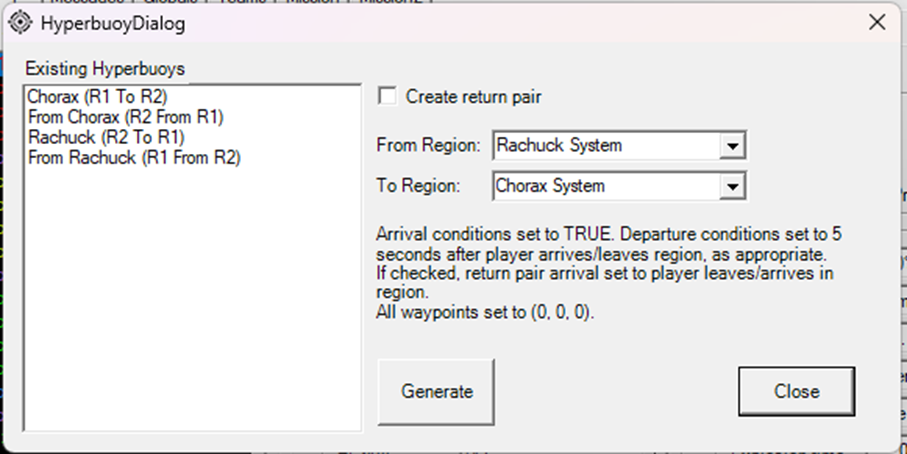
- Hyperbouy Wizard
- This opens a window from which you can quickly place Hyper Buoys to link the different regions. You are given the option to place a return pair as well.
- The buoys are placed at 0,0,0 in each region and don’t have arrival triggers (i.e. are always present)
- See the Hyper Buoy Section for further discussions about the hyper buoys.
- This opens a window from which you can quickly place Hyper Buoys to link the different regions. You are given the option to place a return pair as well.
- Apply Super Backdrops
- This is for X-Wing Alliance Upgrade or TIE Fighter Total Conversion installations and will be covered in a later guide
- Hook Assignment
- This is for X-Wing Alliance Upgrade or TIE Fighter Total Conversion installations and will be covered in a later guide
- Wave Manager
- This opens the Wave manager – See Custom Audio Section for more details
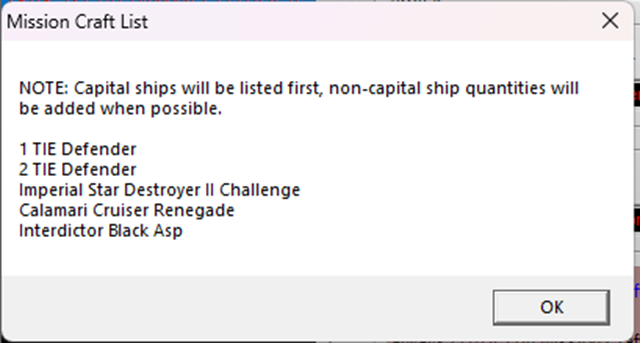
- Mission Craft List
- This opens a window where all craft that will appear as Mission Craft on the Initial Briefing Page are listed
- For a craft to appear as a Mission Craft it must meet the following criteria
- Be a craft
- Be on the same Team as the Player Craft
- Have the Arrival triggers set to “always (TRUE) (In Mission Craft List)”
- For a craft to appear as a Mission Craft it must meet the following criteria
- This opens a window where all craft that will appear as Mission Craft on the Initial Briefing Page are listed
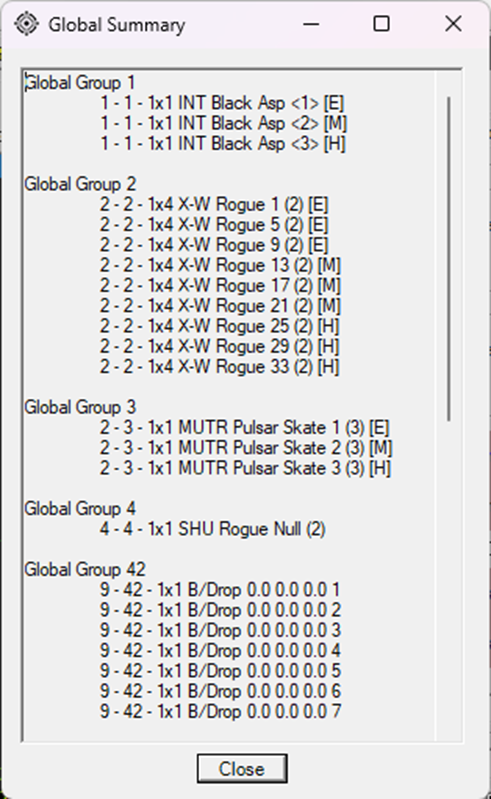
- GG and GU Summary
- Opens a window where all FG are organized and listed under both their assigned Global Groups and Global Units – See Global Groups and Units Section for more details
HELP[edit]
The "Help" Menu contains what you would expect for a Windows based program Help tab with a link to the built-in help files. These help files are very useful and contain much of the information shown here.
Tool Bar[edit]
The Tool Bar at the top of the YOGEME window allows for quick access to many of the function previously mentioned in the Menu Section
1. New Mission
2. Open Mission
3. Save Mission
4. Save As Mission
5. New Flight Group
- This places a new FG in the FG list at the bottom. The initial settings of the FG are determined by the choices selected within the Options Menu
6. Delete Flight Group
- This removes all currently selected FGs from the mission file
7. Copy Flight Group
- This copies the currently selected FG so that it may be duplicated
- All properties of the FG are copied including its Arrival Conditions, Waypoints, Orders, Etc
8. Paste Flight Group
- This pastes a new copy of the last previously copied FG
9. Open Map Window
10. Open Briefing Editor
11. Verify Mission
12. Open Options Menu
13. Open LST Editor
14. Open Wave Manager
15. Open Help File
Flight Groups[edit]
You will spend most of your time when creating a mission on this master tab. This tab with all of its sub tabs is how you will add and modify all the craft, object, and backdrops in your mission. And where you will set their behavior and FG level mission goals.
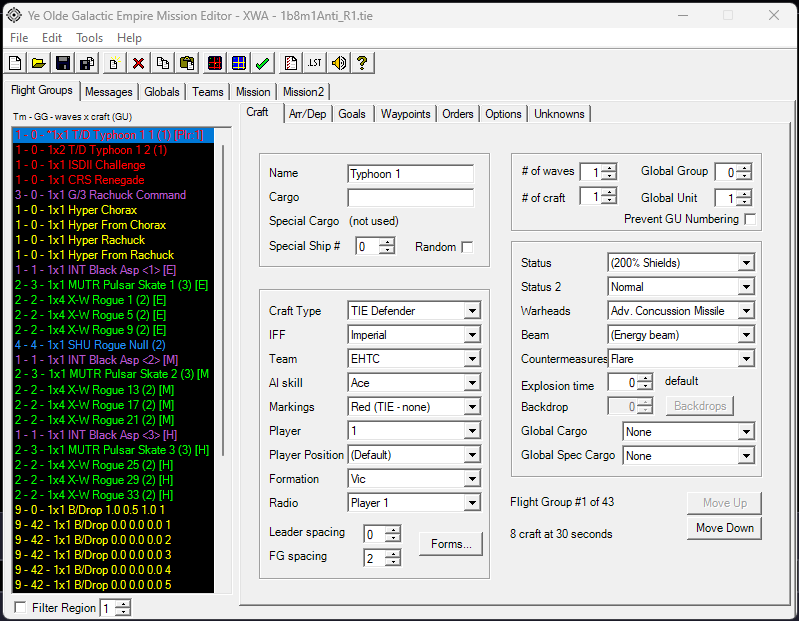
The first thing to know about this tab is how to interpret the craft list on the left.
- The color of the FG shows what IFF has been selected for the FG (Red=Imperial, Green=Rebel, etc.).
- The first number is what Team the FG belongs to.
- The second number is the Global Group that the FG belongs to.
- The third and fourth numbers indicate the number of waves and the number of craft per wave for the FG
- The first part of the text string tells what the craft type is for the FG (X-W=X-Wing, T/D= TIE Defender, etc.)
- The second part of the text is the Name of the FG. This is the name that will be displayed in game on the CMD.
- If there is a number at the end of the text in < >, that indicates there is more than one FG of the same name and type and Global Unit, but that the check box for Prevent GU Numbering has been activated for the FG. This will still happen, even if the FG are set to different difficulties. The number tells you which one in the list the FG is (higher on the list, lower the number).
- If there is a number at the end of the text in a ( ), indicates the Global Unit of the FG.
- Finally, the letter in the [ ] at the end indicates on what difficulty the FG will appear
- No letter in [ ] means it will always be present, no matter the difficulty
- [E] means it will only be present on Easy difficulty
- [M] means it will only be present on Medium difficulty
- [H] means it will only be present on Hard difficulty
- [>E] means it will only be present on Medium or Hard difficulties
- [<H] means it will only be present on Easy or Medium difficulties
Craft[edit]
- Starting at the top left area of the tab you first have the Name Field
- This is the name that will appear in game on the CMD for the craft in the FG.
- The name is limited to a total of 19 characters.
- Below the Name Field you have the Cargo Field
- This is the cargo that will appear in the CMD when the craft is inspected
- Cargos are not shown for fighter size craft in the CMD but they do have them and can either Board to Give their cargo or be boarded to have the cargo taken.
- Cargo is limited to no more than 16 characters
- Below Cargo is where you can create a Special Ship with a Special Cargo
- By default the Special Ship # is set to 0 (zero) which means there is no designated Special Ship in the FG.
- To make a Special Ship either set the Special Ship # to the craft that you want or activate the Random checkbox on the right
- This will activate the Special Cargo field where you can enter the name of the unique cargo that only that one craft in the FG will carry.
- The Special Ship also has the ability to be used for different triggers for Goals or arrival of different craft, orders, or radio messages.
- On the top right area of the tab you first have the # of waves Field
- This is where you specify how many waves, or groups of the same craft, of the FG will appear in the mission
- While the FG might have a delay on its Arrival Trigger, each wave will spawn immediately after all the craft in the FG of the previous wave have been destroyed or have all Gone Home
- As such, great care should be taken when using waves that the FG does not have a condition that will have it Go Home or Depart before the mission has ended.
- Next there is the # of craft Field
- This is where you specify the number of craft in each wave of the FG.
- All craft will appear at the same time and will be in the Formation (see below) specified on their arrival.
- This is where you specify the number of craft in each wave of the FG.
- In the top right you have the Global Group Field
- This is where you specify which Global Group the FG belongs to.
- Next you have the Global Unit Field
- This is where you specify which Global Unit the FG belongs to.
- Finally, you have the Prevent GU Numbering check box
- This option allows you to specify that a FG should not have a number appended to it name when a part of a GU that is not 0.
- This is useful for named craft that you want to be a part of a GU for a control (radio commands) or trigger/goal reasons.
- This option allows you to specify that a FG should not have a number appended to it name when a part of a GU that is not 0.
- On the bottom left area of the tab you first have the Craft Type Field
- This is a drop-down selection window where YOGEME will list every craft in the ship list of the XWA installation you have selected in the Options Menu.
- Craft names that have a * before them are basically blank and should not be used, even if they have a name/description associated with them
- Craft names that have a + after them are craft that have been added via a mod.
- This is a good way to see that you are using a mod craft and that you will need to specify that mod be used when playing the mission.
- This is a drop-down selection window where YOGEME will list every craft in the ship list of the XWA installation you have selected in the Options Menu.
- Next you have the IFF Field
- This controls what color the craft will appear as in the CMD in game. Also, the color of its arrival notification in the message log will be.
- This DOES NOT control whether a craft is considered a friend, neutral, or enemy in game
- This IS a way to designate targets for Orders or other triggers.
- You can set the name of each IFF color on the Mission2 Tab
- Next you have the Team Field
- This how you designate what team a FG will be considered as
- This controls whether a craft is marked as Friendly, Neutral, or Enemy in game, but does not directly control who AI will attack as FGs can be ordered to attack any other group
- This does control when you get the automatic message of "You have fired on a friendly craft"
- You set the names of teams and which teams are friendly, neutral, and enemies to each other in the Teams Tab
- This controls whether a craft is marked as Friendly, Neutral, or Enemy in game, but does not directly control who AI will attack as FGs can be ordered to attack any other group
- This how you designate what team a FG will be considered as
- Next you have the AI skill Field
- This controls the AI level at NORMAL difficulty settings
- See Difficulty Settings for how AI level automatically changes for the difficulty settings
- The skill levels are:
- Novice
- Officer
- Veteran
- Ace
- Top Ace
- Super Ace
- The skill level controls at what distance the FG will start firing at a target, how effective they are at pursuing and evading opponents, and how likely they are to fire as a whole FG at a single target
- This controls the AI level at NORMAL difficulty settings
- Next you have the Markings Field
- In the base XWA game, you have four colors that you can pick from for a FG.
- Colors apply to a designated area on the craft model and not to all markings on the flight model.
- In the base XWA game, you have four colors that you can pick from for a FG.
- Next you have the Player Field
- XWA missions can be made to be used in multi-player Co-op and PvP type missions, but this guide will not go into detail on how to utilize that functionality as the base XWA game can not be used in Co-op.
- For the purposes of EH missions this field is either:
- AI - For all craft other than the player
- 1 - For the FG that the player is to be a part of
- Next you have the Player Position Field
- This controls what craft of the FG the player will be (i.e. Alpha 2, Alpha 3, Alpha 4, etc)
- You would think that (Default) would mean position 1 but it doesn't. The default position is 2
- The only way to have the player in the first position of the FG naming is to use a [https://wiki.emperorshammer.org/X-Wing_Alliance_Advanced_Mission_Creation#Global_Groups_and_Units GU} and have the player in a separate FG of 1 craft placed highest of the GU in the list in the editor.
- You would think that (Default) would mean position 1 but it doesn't. The default position is 2
- This controls what craft of the FG the player will be (i.e. Alpha 2, Alpha 3, Alpha 4, etc)
- Next you have the Formation Field
- This is where you select what formation the FG will fly in when arriving via hyperspace or flying through waypoints
- For XWA there are 34 possible formations for a FG to use. See below for discussion of the Forms window for more details
- Next you have the Radio Field
- Again, XWA has the ability to be made to support multi-player missions but it is currently not supported
- It was thought that this controlled whether a FG would respond to the players commands via the keyboard shortcut commands (Shift+A, Shift+C, etc.) or the Flight Commands tab in game, but through testing it has been determined that the real controlling factor is whether the FG is in the same GU as the player craft or not.
- Next you have the Leader spacing and FG spacing Fields
- These control the distance between craft in the formation
- Finally, you have the Forms... Button
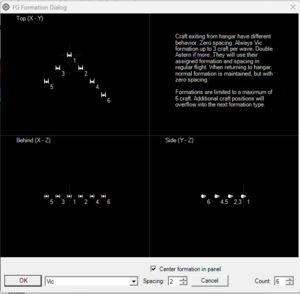
- This opens a window where you will be able to see a preview of the flight formations of a FG
- The Top Left region shows the Top Down view of the FG Formation
- The Bottom Left region shows the Rear view of the FG Formation
- The Bottom Right region shows the Side view of the FG Formation
- The Top Right region discusses the limitations of Formations
- No matter the selected formation, a FG of 3 or less craft exiting a hanger will use the Vic formation with a spacing of zero. All FG with 4 or more craft per wave will use a Double Astern formation with a spacing of zero.
- Formations are limited to a maximum of 6 craft per wave.
- Formations with 7 or more craft will overflow into the next formation type.
- The Center formation in panel check box toggles where the preview formation is displayed in the three regions.
- The drop down menu is where you can change the Formation being used by the FG.
- The Spacing: Field is where you control the distance between the craft in the FG Formation.
- The Count: Field is where you put in how many craft in the preview formation. The number of craft in the preview is not controlled by the number of craft in the active FG, only this field.
- Formations are useful in controlling the appearance of the craft in your mission and how coordinated their grouping look.
- Also, very useful to space out formations exiting from hyperspace to prevent the player from being able to destroy multiple craft with a single or dual fired warhead.
- This opens a window where you will be able to see a preview of the flight formations of a FG
- In the middle right area of the tab you first have the Status and Status 2 Fields
- These fields are identical and allow you to select up to two special conditions for the FG from a possible list of 28 options
- Normal: This is the default value and makes no change to the FG
- 2x Warheads: This gives the FG the ability to carry twice the normal amount of warheads
- Most useful for bomber units or the Player's FG if you want them to either have a lot of missiles or perform a heavy bomber role.
- 1/2 Warheads: This gives the FG the ability to carry only half the normal amount of warheads
- Most useful in limiting the amount of warheads the player has available in mission
- Can be negated by the player using infinite ammo cheat in game
- Most useful in limiting the amount of warheads the player has available in mission
- No Shields:
- For craft that normally have shields, this option removes their shields
- For craft that normally do not have shields (i.e. T/F, T/I, etc) this adds a shield system to the craft that starts the mission at 0% and allows them to charge up to the maximum 200%
- 1/2 Shields:
- For craft that normally have shields, this option reduces their shields to 50% and does not allow for charging
- For craft that normally do not have shields (i.e. T/F, T/I, etc) this adds a shield system to the craft that starts at 50% and allows them to charge up to the maximum 200%
- For normally unshielded player craft this option adds a shield system but starts at 0% and allows full charging
- No Lasers:
- This removes the ability for a freighter FG to fire on attackers automatically but they are able to attack targets that they have a direct attack order for.
- This has no effect on fighter craft as they do not have automatic turrets.
- This has no effect on capital ships.
- This is useful in preventing a freighter from being able to intercept incoming warheads, and therefore putting more pressure on the player to defend them.
- No Hyperdrive: This has no effect for AI craft, but if active for a player craft they will not be able to use hyper buoys.
- Shields 0%, charging:
- For craft that do not have a shield system this option has no effect
- For fighter craft that have a shield system this sets the shields to 0% at the start and allows for them to charge up to 200%
- For craft that do not recharge shields (non-fighters) only sets shields to 0%, no charging occurs in mission
- Shields added (200%):
- For normally unshielded craft this adds shields at 100% and allows fighters to charge up to 200%
- For normally shielded craft this sets the shields to 100% and for fighters allows them to charge up to 200%
- Hyperdrive added: This has no effect for AI craft, but if the player is in a craft that normally not able to enter hyperspace would be able to use the hyper buoys if this option is active.
- T/F, T/I, T/B are not normally able to use hyper buoys.
- 2x Countermeasures: This gives the FG the ability to carry twice the normal amount of countermeasures
- Most useful for the Player's FG if you have a lot of enemies with missiles that will be attacking them.
- 1/2 Countermeasures: This gives the FG the ability to carry only half the normal amount of countermeasures
- Most useful in limiting the amount of warhead defense the player has available in mission
- Can be negated by the player using infinite ammo cheat in game
- Most useful in limiting the amount of warhead defense the player has available in mission
- (200% Shields):
- For normally unshielded craft this has NO EFFECT
- For normally shielded craft this sets the shields to 200% at the start of the mission. Only fighters are able to recharge shields if damaged.
- Shields 50%, charging:
- For craft that do not have a shield system this option has no effect and they will still not have shields
- For fighter craft that have a shield system this sets the shields to 50% at the start and allows for them to charge up to 200%
- For craft that do not recharge shields (non-fighters) only sets shields to 50%, no charging occurs in mission
- (No Lasers):
- This removes the ability for a freighter FG to fire on attackers automatically but they are able to attack targets that they have a direct attack order for.
- This has no effect on fighter craft.
- This removes the ability for a Capital Ship FG to fire on attackers automatically or attack targets that they have a direct attack order for.
- This is useful in preventing a capital from being able to intercept incoming warheads, and therefore putting more pressure on the player to defend them.
- Engines Damaged: Has no discernable effect
- Shields + Hyperdrive added:
- Adds shields to AI craft that normally don't have shields. The initial shield amount is 100%
- No effect for player craft that normally has shields and hyperdrive
- Adds shields (at 100% starting value) and the ability to use hyper buoys to player craft that normally can't do either
- All Systems Damaged: Has no discernable effect
- 200% Shields:
- For normally unshielded craft this has NO EFFECT
- For normally shielded craft this sets the shields to 200% at the start of the mission. Only fighters are able to recharge shields if damaged.
- (50% Shields):
- For normally unshielded craft this has NO EFFECT
- For normally shielded craft this sets the shields to 50% at the start of the mission. Only fighters are able to recharge shields if damaged.
- Invincible: This makes the FG impossible to destroy and in the case of capital class ships be disabled either. The FG will be able to have its shields destroyed and its hull strength reduced to 1%, but will not be further damaged. Also, it will be impossible to reduce the system strength of the FG via ion cannons or ion pulses if it is a capital ship.
- Can be useful in limited cases to prevent a story/mission critical craft from being destroyed but GREAT care must be taken if used in a mission. Few things are more frustrating for a player then to spend valuable time attacking a target to then find it impossible to actually destroy the target.
- Infinite Warheads: This gives a FG unlimited warheads, same as if the player has turned on Infinite Ammo cheat.
- No Escape Pods/Ejections: This prevents the possibility of craft of the FG from spawning pilots in space (fighter sized craft) or escape pods (capital and freighter sized craft).
- This is VERY useful to a mission designer if they are at or near the 96 craft limit and have waves or further FGs that need to arrive in the region, as pilots and escape pods count against the 96 craft limit meaning that if they are present no more craft will spawn once the 96 craft limit is reached.
- Also VERY useful to a mission designer to reduce the "clutter" in the targeting list and friendly list in a large battle as the player won't need to cycle through ejected pilots and escape pods looking for the craft they want to target.
- No Cargo Pods: Has no discernable effect
- Not Inspected: Normally, all craft on the same Team as the player are fully identified in the CMD in game with the craft name and cargo, no matter if the player has approached close enough to inspect them or not. This option allows for the cargo of the craft to be unknown until inspected.
- Inspected: Normally, all craft not in on the same Team as the player are unknown until the player, or another craft on the player's team, have approached within a specified distance to reveal their name, and then their cargo remains unknown until they have been inspected by either the player, or another craft on the player's team, has approached closely enough to trigger the inspection of the craft. This option makes it so that any FG is fully identified with its name and cargo, no matter what team they are on.
- Identified: Normally, all craft not in on the same Team as the player are unknown until the player, or another craft on the player's team, have approached within a specified distance to reveal their name. This option makes it so that any FG is fully identified with its name, no matter what team they are on, but their cargo will still be unknown until the player, or another craft on the player's team, has approached closely enough to trigger the inspection of the craft.
- Limited Targetability: Disables the ability to target a craft via either the F1-F3 (Shift+F1-Shift+F3) or Next Target/Previous Target (T/Y) commands. Can still target via the target ship in sights command.
- These fields are identical and allow you to select up to two special conditions for the FG from a possible list of 28 options
- Next you have the Warheads Field
- This is where you select which eight possible warheads the FG can be armed with
- None: No warheads
- Space Bomb: Ultra high damage, unguided and very slow warhead. Only suitable for destroying platforms or stationary capital ships. But due to their reduced magazine size, Heavy Rockets will always be the better option
- Heavy Rocket: High damage, low-guidance and relatively slow warhead. Can be used against stationary targets and capital ships. Highest total damage possible to carry via standard warhead load out
- Concussion Missile: Lowest damage, medium-guidance and relatively quick warhead. Can be used only for anti-fighter tasks. Out shone in all ways by the advanced version
- Torpedo: Medium damage, low-guidance and medium speed warhead. Can be used only for anti-capital tasks or attacking fixed platforms. Out shone in all ways by the advanced version
- Adv. Concussion Missile: Medium damage, high-guidance and fast warhead. Best warhead available for anti-fighter tasks
- Adv. Torpedo: Medium-high damage, medium-guidance and relatively quick warhead. Best warhead available for attacking quicker capital ships (M/CRV, etc) and can also be used to attack slower fighters (B/W, Y/W, etc)
- Mag Pulse: No damage, high-guidance and fast warhead. Disables all weapons of any craft that is hit for 30 seconds per warhead impact (if dual-fired 60 second disruption of weapons if both hit). Very useful for stopping the weapons of capital ships
- (Ion Pulse): Does same damage as a Adv. Missile, but only to shields and once the shields are gone, reduces the Systems Strength until the target is disabled.
- This is where you select which eight possible warheads the FG can be armed with
- Next you have the Beam Field
- This is where you select which four possible beam systems the FG can be armed with
- None: No beam system
- Tractor beam: Tractor beam prevents the targeted craft from turning and slows them down. Useful to hit fast moving or maneuverable targets
- Jamming beam: Jamming beam prevents the targeted craft from targeting any other craft. Useful to disable a craft from attacking another ship you are defending
- Decoy beam: Decoy beam prevents warheads from targeting your craft
- (Energy beam): Has no function other than to allow the player to redirect power from the beam system to the engines for greater speed
- This is where you select which four possible beam systems the FG can be armed with
- Next you have the Countermeasures Field
- This is where you select which two possible countermeasures the FG can be armed with
- None: No countermeasures
- Chaff: This releases particles behind the craft that prevent any warhead damage from transferring to the craft if the warhead hits the particles. While no damage transfers, the impact spin from the warhead hit still happens
- Flare: This releases a short range, medium speed and tracking warhead that will first home-in on incoming warheads, or if no warhead is in range, the closest enemy fighter. Does nearly no damage but does impart the warhead impact spin on the target if it hits
- (Cluster Mine): This is just a Flare
- This is where you select which two possible countermeasures the FG can be armed with
- Next you have the Explosion time Field
- This controls how long capital ship or platform takes to blow up once destroyed
- This can be used in a mission to make a destruction event more cinematic and drawn out but use with caution as AI will continue to attack a destroyed target until it actually blows up
- This controls how long capital ship or platform takes to blow up once destroyed
- Next you have the Backdrop Field and Backdrops button
- See Backdrops Section for details
- Next you have the Global Cargo Field and Global Spec Cargo Field
- These allow you to select that the FG will carry one of the Global Cargos/Special Cargos that you can specify on the Mission2 Tab
- Finally, at the far bottom right you have Move Up and Move Down Buttons
- These buttons allow you to reorder the FG(s) you have selected to allow the organization of the FG list in the editor
- You also have the text "Flight Groug #Y of XX" and "XX craft at 30 seconds"
- The first text string informs you how many total FGs you have in the mission and what position in the FG list the top-most selected FG is
- YOGEME enforces the XWA game engine limit of no more than 192 FGs per mission
- The second text string is a sanity check on how many possible craft are in the mission at the 30 second mark
- You can only have 96 craft in a region at the same time
- This check DOES NOT factor in what region each craft is in, or on what difficulty the craft is set to spawn on
- Therefore, while this check is useful, it is common for it to show an error in a mission that is fully acceptable
- The first text string informs you how many total FGs you have in the mission and what position in the FG list the top-most selected FG is
Special Craft Types[edit]
Backdrops[edit]
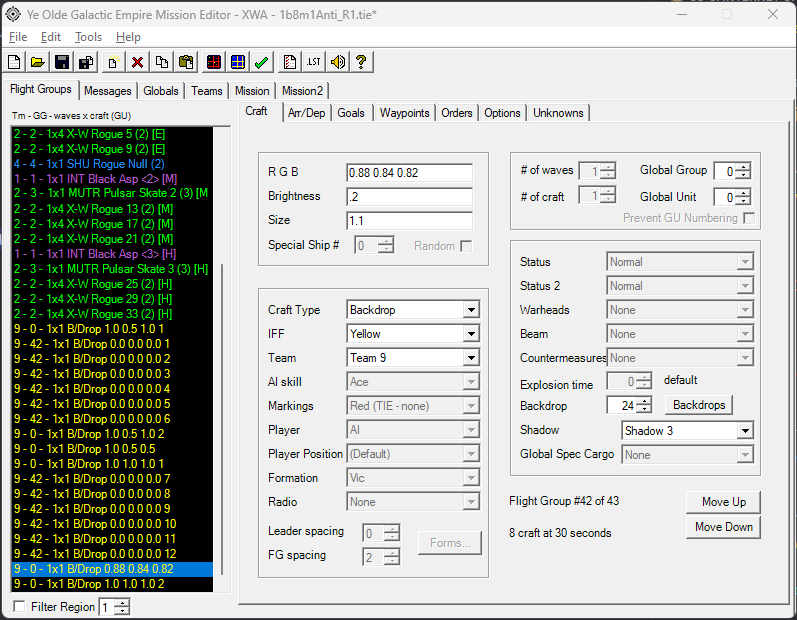
You will want to add one or more backdrops to your missions. These are the images of planets, suns, nebula, and more that the game displays in the far distance to set the scene of your regions. To add backdrops to your mission by creating a new FG and changing its Craft Type to Backdrop (tip: while the drop-down menu is selected or open hit the "B" key until the selection changes to Backdrop). When you select a FG with the Craft Type of Backdrop many small changes happen to Craft Tab. First the Fields at the Top Left change to R G B, Brightness, and Size and the Global Cargo Field in the Bottom-Right changes to Shadow. Next most of the fields of the tab become greyed out and not useable, but the Backdrop Field and Backdrops Button become useable.
First thing to know about backdrops is that the name HAS TO BE a string of three numbers, in the format of 0.00 to the maximum value of 1.00, separated by spaces (i.e. 0.88 0.84 0.82). These numbers are the RGB code for the color of light the backdrop will emit in game, not necessarily the color of the actual image, although it is best to have them the same if possible. If you have a name or some other description in the R G B the game won't know what color the light should be and may not have any light in the mission at all for users who are using XWAU to play your mission. The Backdrop Dialog (see below) will aid in determining the correct RGB values to enter into this field.
The next field, Brightness, is where you specify how much relative light is coming from each light source in game. It can be a very cool effect to have all the light in a region coming from a single source and therefore there will be lots of moving shadows and highlights in the mission as the player and other craft maneuver. The brightness can be any value between 0 and 1.
The Size Field is where you will enter what scale your backdrop image is in game. Most backdrops in the original XWA game are 256x256 in size, but not all and you will need to experiment to determine what scale you want all your backdrop elements to be. The scale and be any value greater than 0.
- Caution should be taken to not scale up a backdrop too much as it will experience distortion as it is stretched around the sphere of the background in game.
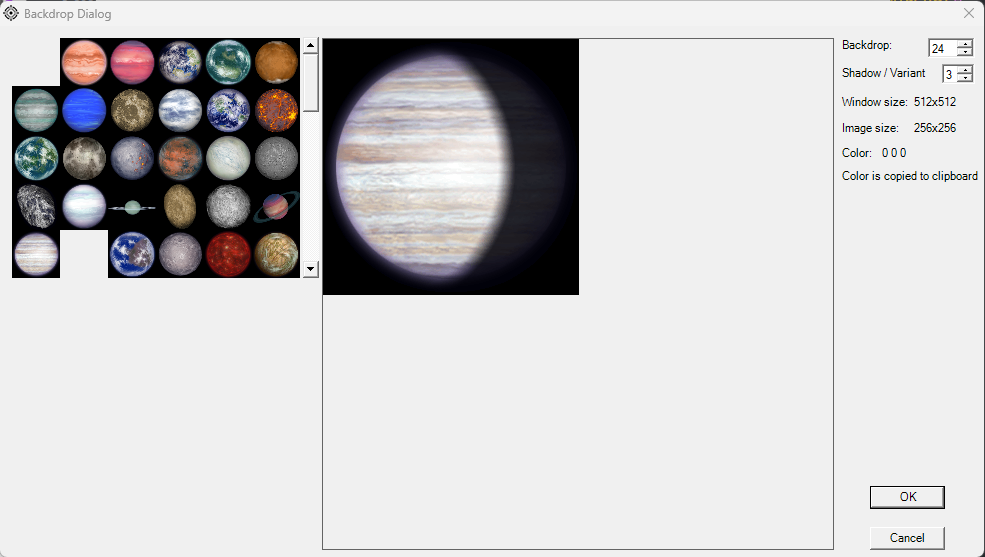
If you know what Backdrop number and Shadow number you want for the Backdrop you can simply enter those values in the correct Fields on the right of the tab, or you can open the Backdrop Dialog be pressing the Backdrops Button on the far right.
This dialog opens a preview window where you can see all the possible backdrops to be added to the mission. For most of the lower number backdrops (planets) they have multiple Shadow/Variants that will make them appear to being lit from one side or the other to differing amounts to allow you to add more realism to the appearance of the planets in your missions. If you move your mouse cursor over the selected Backdrop's preview image, you will see a color square on the far right changing to show the color that your cursor is over in that moment. If you click on that spot in the image the RGB value for that color will be stored to the clipboard and you can then go to the R G B Field and paste the RGB value as the "correct" name for the backdrop.
Where the backdrop appears in game relative to all the other backdrops is controlled via the Waypoints Tab and the Start Point 1 for the backdrop FG. All backdrops are "projected" onto the infinitely far away background of the mission and only the relative vector of the start point relative to 0,0,0 matters for the position of the backdrop in game (i.e. 0,5,0 and 0,1,0 will appear in the same place in game, on top of one another). In a case where two backdrops overlap, which one is shown to be "on top" of the other is controlled by which backdrop is lower down the FG list (the higher up the list, the further "in back" the backdrop is).
- Care should be taken in placing the backdrops as sever distortion occurs near the "seams" between the different directions on the background sphere and therefore you should avoid placing round backdrop images (i.e. planets) near the seams (i.e. don't have a backdrop with a start point of 1,1,0).
Hyper Buoys[edit]
Asteroids[edit]
random centered on start point. maximum distance of 2.5 km from center but only when a large number of asteroids in FG. when a smaller amount within 1.5 km.
When you set the Craft Type to Asteroid Field the game will place random sized asteroids centered about the Start Point 1 based off several parameters.
- Asteroids DO NOT count as normal craft, and instead count against the total allowed number of space objects.
- The number of asteroids and their distance from the center is dependent on the value in # of craft Field
- A value of 1 will place a larger asteroid randomly within 1.5km of the Start Point.
- A value of 99 will place a dispersion of that number of different sized asteroids randomly within 2.5km of the Start Point.
- Asteroids cannot be destroyed or targeted
- Cannot move in mission except for their battle spins
- Should not give them any Status settings as it would be pointless
Mines[edit]
- Does not change with difficulty
- craft count is how many per side of the grid (i.e. craft count of 4 equals 16 mines)
- grid is centered on start point
Ar/Dep[edit]
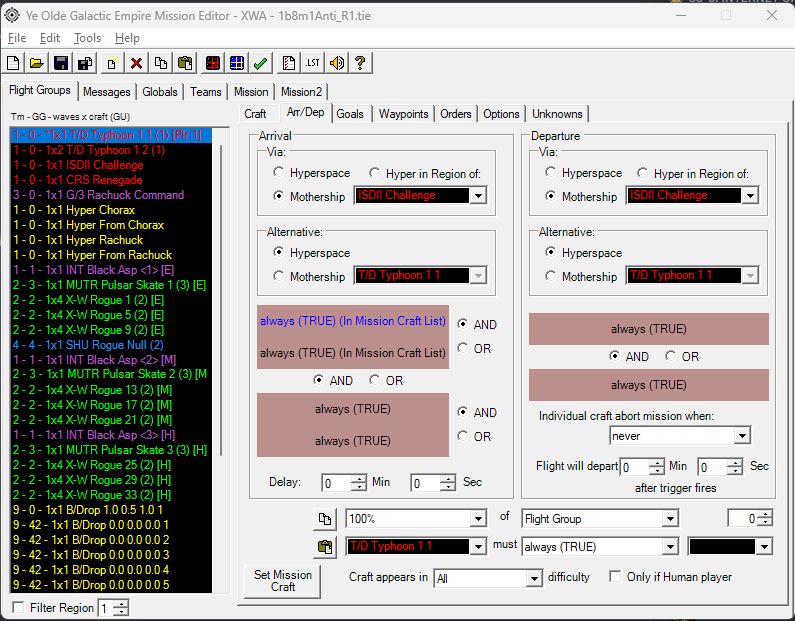
- First, on the left of the tab there are the Arrival conditions for the FG
- The Via: section is where you specify the primary way a FG will arrive in their starting region
- The default option is Hyperspace: This has the craft hyperspace in if they are to arrive after the player is in region, or always be at their starting point (see Waypoints Tab)
- Be careful to not select this for a craft that should not have a hyperdrive as it breaks the immersion of the mission
- Hyper in Region of: does not seem to be correctly working at this time as the option does not stay selected for a craft
- Mothership and its selection menu is how you select a ship for the FG to fly out of its hanger. The Mothership does not have to have an actual hanger, but care should be taken on the relative sizes between the Mothership and the FG as if you have too large of a craft try to launch from a small Mothership, one or both can be damaged or destroyed
- The Player FG MUST use the Mothership arrival option
- The default option is Hyperspace: This has the craft hyperspace in if they are to arrive after the player is in region, or always be at their starting point (see Waypoints Tab)
- The Alternative: section is where you specify how a FG is to arrive if it cannot arrive via the primary method. It has the same options as the Via: section
- The Via: section is where you specify the primary way a FG will arrive in their starting region
Goals[edit]
Waypoints[edit]
Orders[edit]
Options[edit]
Unknowns[edit]
Messages[edit]
Globals[edit]
Teams[edit]
Mission[edit]
Mission2[edit]
Map[edit]
Briefing[edit]
Briefing[edit]
Tags and Strings[edit]
Event List[edit]
Visibility to Teams[edit]
Design Aspects[edit]
Triggers[edit]
Custom Audio[edit]
An optional, but highly suggested addition to any custom XWA battle is the addition of custom audio to play when radio messages or the briefings are displayed. The addition of custom audio really increases the perceived production value of a custom mission. See XWA Custom Audio for more details on how to add the audio to missions.
Emails[edit]
An optional, but highly suggested addition to any custom XWA battle is the addition of custom emails for the player to read. You can utilize the emails to tell more of the background story or give a greater amount of humor to your battles. See XWA Emails for in-depth discussion on how to add emails to the battle.
Global Groups and Units[edit]
GU adds a space and then the number. only being in the gu matters for the radio commands
