Difference between revisions of "TIECorps Tailoring Tool 3"
(Added basic instructions) |
(tidy up some instructions) |
||
| (8 intermediate revisions by 2 users not shown) | |||
| Line 5: | Line 5: | ||
=== Introduction: What is TTT? === | === Introduction: What is TTT? === | ||
| − | Since the template files for the uniforms are 3D models, which not too many people can easily work with, this tool is for assembling the uniform parts from given personnel data (either entered via the GUI or imported from the | + | Since the template files for the uniforms are 3D models, which not too many people can easily work with, this tool is for assembling the uniform parts from given personnel data (either entered via the GUI or imported from the EH database). |
| − | TTT3 generates a basic preview | + | TTT3 generates a basic preview using POV-Ray (the Persistence of Vision raytracer), allowing the user to comfortably set camera position, lighting and some other options, and finally renders the complete uniform image by calling POV-Ray to render the image as per your selections. |
While it would have been easier and faster to just render out template pictures and have TTT put them together, as the first version of the program did, there would have been some disadvantages. | While it would have been easier and faster to just render out template pictures and have TTT put them together, as the first version of the program did, there would have been some disadvantages. | ||
| Line 16: | Line 16: | ||
== Instructions == | == Instructions == | ||
| + | |||
| + | === Installation Instructions === | ||
| + | |||
| + | There are 3 programs that need to be installed: | ||
| + | |||
| + | * Persistence of Vision Raytracer (POV-Ray) Installer | ||
| + | * Windows Editor DLLs for POV-Ray | ||
| + | * TIE Corps Tailoring Tool (TTT3) | ||
| + | |||
| + | The most up to date links for these tools can be found on the [https://tc.emperorshammer.org/uniforms.php EH TC Uniforms] page. | ||
| + | |||
| + | Once POV-Ray and its DLLs have been installed, unzip TTT3 to a new directory (such as C:\TTT3) and run TTT3.exe. | ||
=== Basic Use Instructions === | === Basic Use Instructions === | ||
| − | # Launch TTT3 | + | # Launch TTT3. |
| − | # Switch to the Import Tab | + | # Switch to the Import Tab. |
| − | # Enter your PIN | + | # Enter your PIN. |
| − | # Press Import | + | # Press the Import button. |
| − | # After your information loads, press the Dress Uniform button which will then open up the TTT3 Rendering Options screen. | + | # After your information loads, press the Dress Uniform button which will then open up the TTT3 Rendering Options screen. <br />[[File:Ttt3_import_tab_annotated_text.png|400px]] |
| − | # Press the Raytrace button to launch POV-Ray which will then start generating the uniform. | + | # Press the Raytrace button to launch POV-Ray which will then start generating the uniform. <br />[[File:Dress_uniform_annotated.png|400px]] |
| − | # Once generation is finished the image will be shown and the uniform will automatically be saved as dress.png in the data folder. Optionally after the image is generated you can use Save As button to save the image to a new location. | + | # Once generation is finished the image will be shown and the uniform will automatically be saved as dress.png in the data folder. Optionally after the image is generated you can use Save As button to save the image to a new location. <br />[[File:uniform_output.png|400px]] |
| − | # In a web browser, log in to your [https://tc.emperorshammer.org/ | + | # In a web browser, log in to your [https://tc.emperorshammer.org/management.php EH TC account]. |
| − | # Navigate to Upload | + | # Navigate to the Upload uniform image link. |
| − | # Press Choose File and pick you newly generated uniform image | + | # Press Choose File and pick you newly generated uniform image. |
| − | # Upload the uniform to submit it for approval | + | # Upload the uniform to submit it for approval. |
| + | |||
| + | == Troubleshooting == | ||
| + | |||
| + | === Windows Defender SmartScreen Blocks === | ||
| + | |||
| + | Occasionally for new (or beta) versions of TTT3 Windows Defender SmartScreen may alert you that "Windows protected your PC" when opening TTT3 for the first time. Due to cost, we have not purchased a software developer certificate and therefore new versions of the application are not immediately trusted by Microsoft. You can select "More info" followed by "Run anyway" to allow TTT3 to operate. We perform a manual process with Microsoft to whitelist the new version of the application which is typically completed within several days of the new version's release. | ||
| + | |||
| + | === Installation Directory or Access Denied Errors === | ||
| + | |||
| + | Some anti-virus applications block executables from running in certain directories, such as the user's Desktop, temporary files, or Downloads directories. This typically manifests as some type of "access denied" error, however the exact message or action depends on your particular software and configuration. If you experience this problem, moving the unzipped TTT3 directory to another home (such as C:\TTT3) will resolve it. | ||
| + | |||
| + | TTT3 does ''not'' require administrator rights to run, but does require write access to its own installation directory. The only time TTT3 would require administrator rights is if installing to somewhere your user account does not normally have write access to (such as C:\Program Files). | ||
| + | |||
| + | [[Category:Guides]] | ||
Latest revision as of 08:43, 21 November 2023
Application[edit]
TIECorps Tailoring Tool 3 is a program for creating Emperor's Hammer and TIE Corps uniforms, created in 2021. The creation of version 3 of this tool was spearheaded by SkyShadow with support from many other EHTC members. Version 3 replaces TTT, Tempest's Tailoring Tool 2. This application is maintained by the EH Internet Office for the exclusive use of the Emperor's Hammer, and is the only official and approved tool that may be used for this task.
Introduction: What is TTT?[edit]
Since the template files for the uniforms are 3D models, which not too many people can easily work with, this tool is for assembling the uniform parts from given personnel data (either entered via the GUI or imported from the EH database).
TTT3 generates a basic preview using POV-Ray (the Persistence of Vision raytracer), allowing the user to comfortably set camera position, lighting and some other options, and finally renders the complete uniform image by calling POV-Ray to render the image as per your selections.
While it would have been easier and faster to just render out template pictures and have TTT put them together, as the first version of the program did, there would have been some disadvantages.
First, when putting images together that look 3D, but are only 2D, the objects don't interact (don't reflect and don't cast shadows on each other). Elements that do not always appear on the exact same spot (like a 3rd class merit medal) would also look perspectively wrong when put to a location where they were not originally rendered at. You therefore end up with a kind of 2.5D look.
Second, working with the 3D data directly adds a new level of flexibility, like being able to set the camera and lighting, change the resolution, and so on.
Instructions[edit]
Installation Instructions[edit]
There are 3 programs that need to be installed:
- Persistence of Vision Raytracer (POV-Ray) Installer
- Windows Editor DLLs for POV-Ray
- TIE Corps Tailoring Tool (TTT3)
The most up to date links for these tools can be found on the EH TC Uniforms page.
Once POV-Ray and its DLLs have been installed, unzip TTT3 to a new directory (such as C:\TTT3) and run TTT3.exe.
Basic Use Instructions[edit]
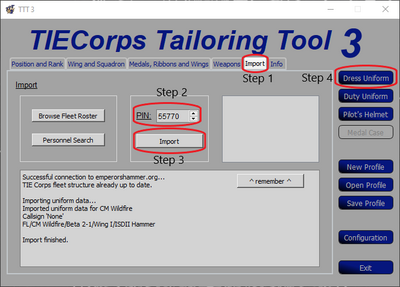
- Launch TTT3.
- Switch to the Import Tab.
- Enter your PIN.
- Press the Import button.
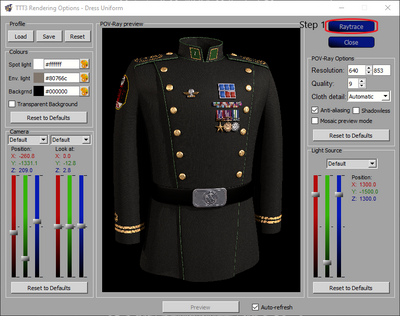
- After your information loads, press the Dress Uniform button which will then open up the TTT3 Rendering Options screen.

- Press the Raytrace button to launch POV-Ray which will then start generating the uniform.

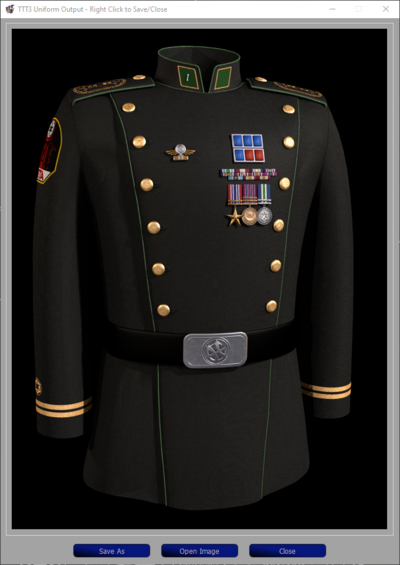
- Once generation is finished the image will be shown and the uniform will automatically be saved as dress.png in the data folder. Optionally after the image is generated you can use Save As button to save the image to a new location.

- In a web browser, log in to your EH TC account.
- Navigate to the Upload uniform image link.
- Press Choose File and pick you newly generated uniform image.
- Upload the uniform to submit it for approval.
Troubleshooting[edit]
Windows Defender SmartScreen Blocks[edit]
Occasionally for new (or beta) versions of TTT3 Windows Defender SmartScreen may alert you that "Windows protected your PC" when opening TTT3 for the first time. Due to cost, we have not purchased a software developer certificate and therefore new versions of the application are not immediately trusted by Microsoft. You can select "More info" followed by "Run anyway" to allow TTT3 to operate. We perform a manual process with Microsoft to whitelist the new version of the application which is typically completed within several days of the new version's release.
Installation Directory or Access Denied Errors[edit]
Some anti-virus applications block executables from running in certain directories, such as the user's Desktop, temporary files, or Downloads directories. This typically manifests as some type of "access denied" error, however the exact message or action depends on your particular software and configuration. If you experience this problem, moving the unzipped TTT3 directory to another home (such as C:\TTT3) will resolve it.
TTT3 does not require administrator rights to run, but does require write access to its own installation directory. The only time TTT3 would require administrator rights is if installing to somewhere your user account does not normally have write access to (such as C:\Program Files).